 by
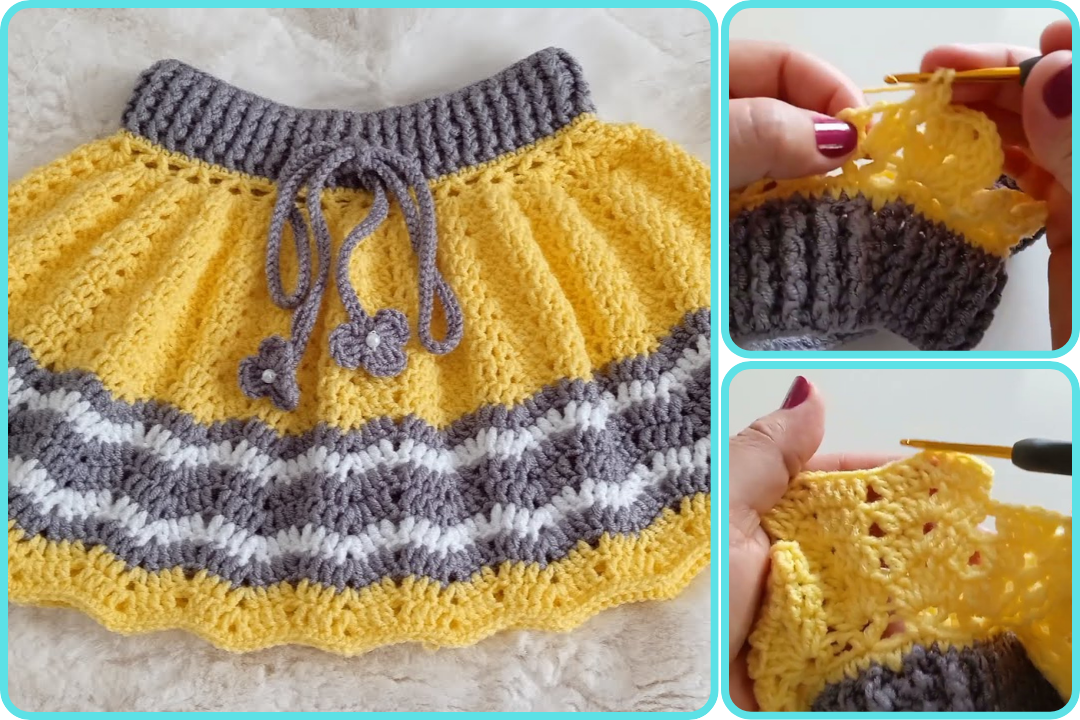
by Sure, here is the detail about how to make a striped children’s skirt for 2 to 4 years old.
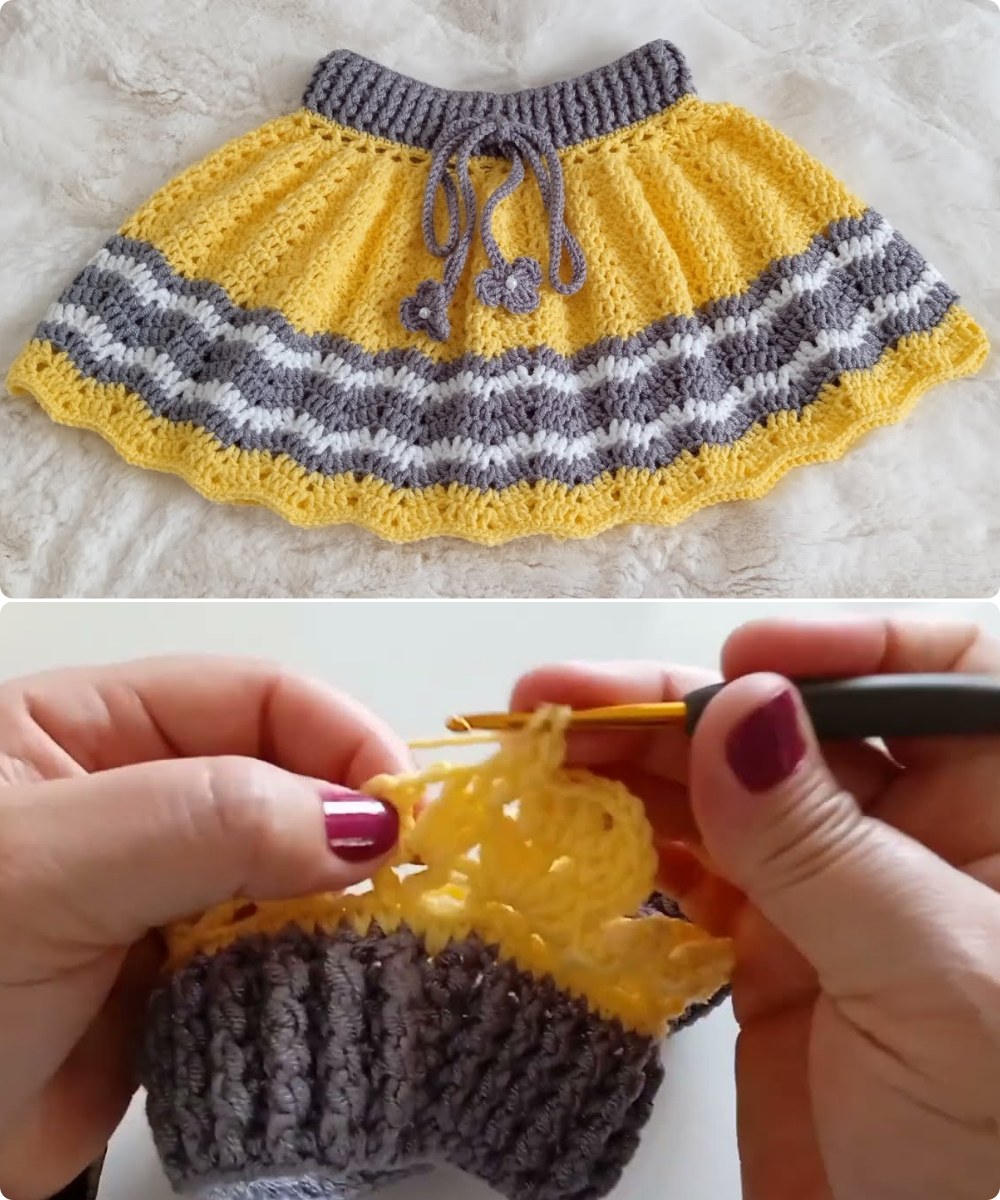
A striped children’s skirt for a 2-4 year old is a fantastic project that’s both fun to make and delightful to see a child wear. The key to “striped in the middle” often refers to having the main body of the skirt in stripes, with potentially a solid waistband and hem, or simply focusing the stripe pattern on the main skirt portion.
This guide will assume a crocheted skirt, building on the previous “easy and simple” skirt, but specifically focusing on incorporating stripes.
Understanding the “Striped in the Middle” Concept
“Striped in the middle” typically means the main body of the skirt will feature your stripe pattern. The waistband and potentially the very bottom border could be in a solid color to frame the stripes, or the stripes could extend from top to bottom. For a 2-4 year old, this often translates to:
- Option 1 (Classic Stripe): Stripes run from just below the waistband down to the hem.
- Option 2 (Framed Stripe): A solid color waistband, a main section with stripes, and then a solid color hem. This is often very visually appealing.
This guide will lean towards Option 1 (Classic Stripe) as it’s often simpler for beginners as you don’t need to re-attach yarn for the bottom border.
Key Considerations for a Striped Skirt
- Color Choices: Beyond just two colors, you can use multiple colors for a vibrant look. Consider complementary colors or a rainbow theme.
- Stripe Width: Decide how many rows/rounds each stripe color will be. Thin stripes (1-2 rows) are delicate, while wider stripes (3-5 rows) are bolder. Consistency is key for a polished look.
- Seamless Color Changes: Learning how to change colors neatly is essential for a clean striped appearance.
- Yarn Ends: Striped projects mean more yarn ends to weave in! Prepare for this step.
Measurements for a 2-4 Year Old Skirt
These are general guidelines. Always double-check with the child’s actual measurements if possible, or refer to a standard size chart for children’s clothing.
- Age 2: Waist: 19-20.5 inches (48-52 cm), Length: 9-10 inches (23-25 cm)
- Age 3: Waist: 20-21 inches (51-53 cm), Length: 10-11 inches (25-28 cm)
- Age 4: Waist: 20.5-21.5 inches (52-55 cm), Length: 11-12 inches (28-30 cm)
Remember: The elastic waistband will provide flexibility in fit. The length is from the waist to the desired hemline (e.g., knee or above knee).
Materials You’ll Need
- Yarn:
- Colors: At least two different colors. Choose soft, washable, child-friendly yarn (acrylic or cotton blend recommended).
- Weight: Light Worsted (DK / weight 3) or Worsted Weight (Aran / weight 4) is ideal for good drape.
- Quantity: 1-2 skeins of each chosen color, depending on the number of colors, stripe width, and skirt length.
- Crochet Hook: Size appropriate for your chosen yarn (e.g., 4.0mm – 5.5mm). Refer to yarn label and pattern.
- Elastic: 3/4 inch (2 cm) or 1 inch (2.5 cm) wide non-roll elastic. Length: About 1-2 inches (2.5-5 cm) shorter than the child’s actual waist measurement.
- Scissors:
- Yarn Needle (Tapestry Needle): Crucial for weaving in all those ends and seaming the elastic.
- Measuring Tape:
- Stitch Marker: Essential for marking the beginning of rounds.
- Sewing Needle and Thread (matching elastic): For joining elastic ends.
Essential Crochet Stitches
- Chain (ch)
- Slip Stitch (sl st)
- Single Crochet (sc) – Good for waistbands and dense fabric.
- Half Double Crochet (hdc) – Works up faster than sc, denser than dc.
- Double Crochet (dc) – Works up quickly, creates a nice drape for skirts.
Step-by-Step Guide to Making a Striped Skirt
This guide assumes a top-down construction with a separate casing for elastic and double crochet (dc) as the main stitch for the body, as it’s quick and creates a good drape.
1. Choose Colors and Stripe Pattern
- Colors: Select your two or more colors. Let’s call them Color A (for the waistband and maybe a solid base) and Color B, C, D for stripes.
- Stripe Width: Decide how many rounds each stripe will be. For example:
- Thin stripes: 1 or 2 rounds per color.
- Medium stripes: 3-4 rounds per color.
- Wider stripes: 5+ rounds per color.
- Example Pattern: 2 rounds Color B, 2 rounds Color C, 2 rounds Color D, repeat.
2. Make a Gauge Swatch (Do Not Skip!)
- Using your main skirt stitch (e.g., dc) and your chosen hook size, crochet a swatch.
- Measure your stitches and rows per 4 inches (10 cm).
- Adjust hook size as needed until your gauge matches your desired fabric density or a pattern’s recommendation.
3. Create the Waistband (Casing for Elastic)
We’ll start with a solid color waistband to frame the stripes neatly. Use Color A.
- Starting Chain: Chain a number of stitches that, when joined, will fit comfortably around the child’s waist without stretching. Make sure the number of chains is suitable for your stitch pattern (e.g., an even number, or a multiple of your increase repeat later). A good starting point is about 60-70 chains for a 2-4 year old, but adjust based on your gauge and child’s measurements.
- Join Chain: Carefully join the chain with a slip stitch to the first chain, making sure it’s not twisted.
- Round 1: Ch 2 (counts as first hdc, or ch 3 for first dc if you prefer a taller casing), hdc (or dc) into each chain around. Join with sl st to top of starting ch.
- Subsequent Waistband Rounds: Ch 2 (or 3), hdc (or dc) into each stitch around. Join with sl st.
- Continue for enough rounds to create a casing that is about 1 inch (2.5 cm) taller than the width of your elastic. So, for a 1-inch elastic, make the casing about 2 inches (5 cm) tall.
- For example, if using hdc and 1-inch elastic, you might do 4-5 rounds. If using sc, more rounds would be needed.

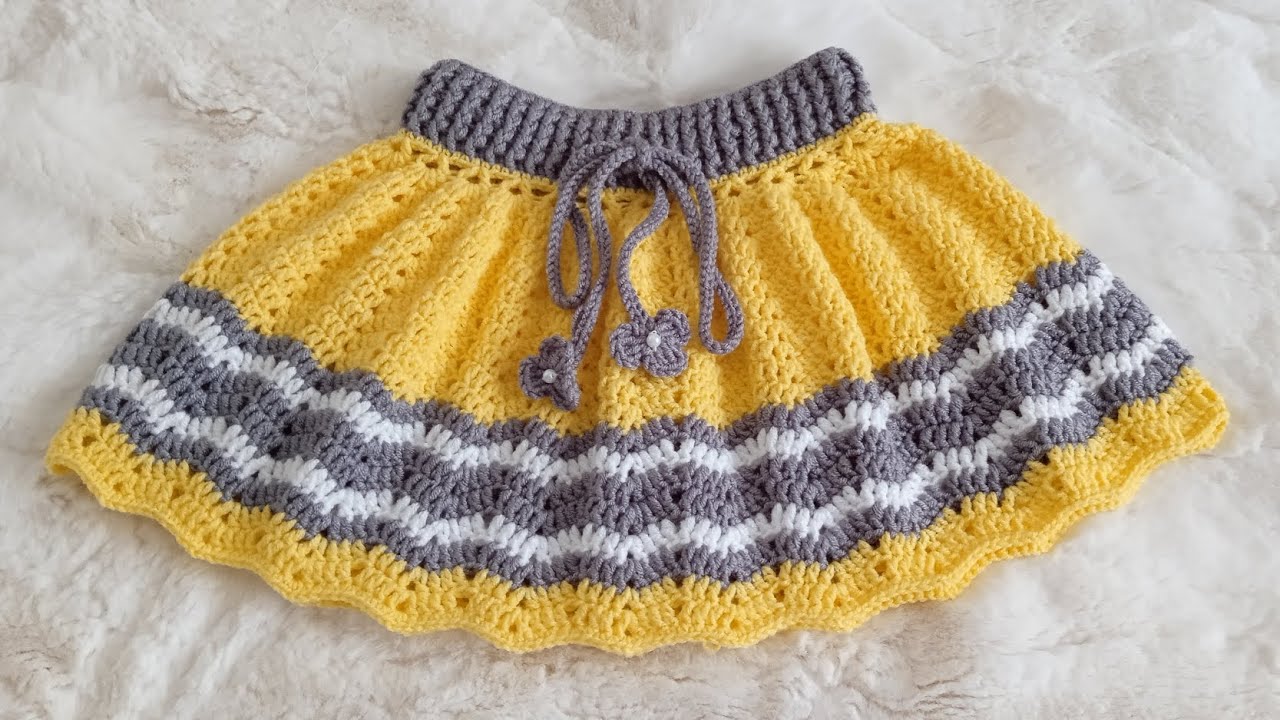
4. Transition to Stripes and Create the Skirt Body
Now, introduce your stripe colors.
- Change Color for First Stripe:
- At the end of your last waistband round (in Color A), make the very last yarn over of your slip stitch join with your first stripe color (e.g., Color B).
- Cut Color A, leaving a 6-inch tail to weave in.
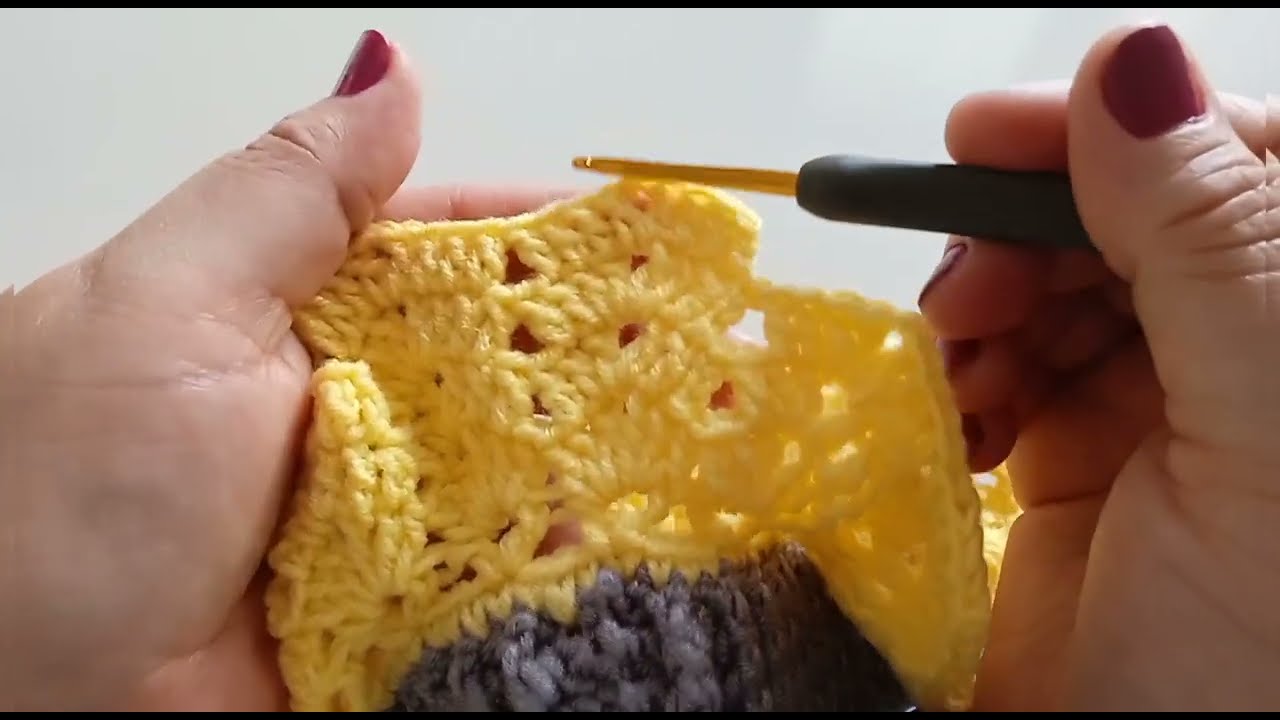
- Round 1 (Skirt Body, Color B): Ch 3 (counts as first dc). Work 1 dc into each stitch around. Join with sl st to top of starting ch-3.
- Self-Correction Tip: If you notice your skirt pulling in or out significantly after the waistband, you might need to make a few increases or decreases in this first round of the skirt body to adjust the circumference slightly before starting the main stripe pattern.
- Subsequent Stripe Rounds (Color B): Ch 3, dc into each stitch around. Join with sl st.
- Repeat this for the desired number of rounds for your first stripe (e.g., 2 rounds of Color B).
- Change to Next Stripe Color (e.g., Color C):
- At the end of the last round of Color B, make the very last yarn over of your slip stitch join with your next stripe color (e.g., Color C).
- Cut Color B, leaving a 6-inch tail.
- Continue Stripes and Increases:
- Repeat the process: Work desired number of rounds in Color C, changing to Color D, and so on, following your chosen stripe pattern.
- Increasing for Flare: To create a gradual flare for the skirt, you’ll need to increase stitches periodically.
- Gentle Flare: Every 3-5 rounds, evenly distribute 4-8 increases around the skirt. For example, in an increase round, you might work
*dc in next 10 sts, 2 dc in next st*repeated around. - The exact frequency and number of increases depend on your yarn, hook, and desired fullness.
- Gentle Flare: Every 3-5 rounds, evenly distribute 4-8 increases around the skirt. For example, in an increase round, you might work
- Continue this process until the skirt reaches the desired length for a 2-4 year old (approx. 9-12 inches / 23-30 cm from the top of the waistband).
5. Finishing the Hem (Optional, can be solid or striped)
You can continue the stripes to the very end or finish with a solid color border (like Color A) to match the waistband.
- Solid Border Example: Switch to Color A, work 2-3 rounds of sc or hdc for a neat, sturdy hem.
- Scalloped Edge (optional): For a pretty finish, you could add a round of shell stitches:
*(2 dc, ch 1, 2 dc) in same stitch, skip 2 stitches, sl st into next stitch*repeated around.
6. Add the Elastic Waistband
- Prepare Elastic: Cut your elastic to the appropriate length (1-2 inches shorter than the child’s actual waist). Overlap the ends by about 0.5-1 inch (1-2.5 cm) and securely sew them together, forming a loop. Use strong thread and multiple stitches.
- Create Casing: Fold over the top edge of your crocheted waistband (the solid color part) inwards towards the wrong side of the skirt. The fold should cover the elastic’s width.
- Stitch Casing: Using your yarn needle and a matching yarn, stitch the folded edge down, leaving a small opening (about 1 inch / 2.5 cm wide). Make sure your stitches only go through one layer of the crocheted fabric to form a channel.
- Insert Elastic: Attach a safety pin to one end of the elastic loop. Thread the safety pin through the opening you left in the casing, guiding the elastic all the way around until it emerges from the same opening.
- Close Opening: Once the elastic is threaded through, remove the safety pin and sew up the small opening in the casing with your yarn needle and matching yarn. The elastic will gather the fabric, creating the perfect waistband.
7. Weave in All Ends
This is arguably the most time-consuming part of a striped project, but it’s essential for a clean finish and durability.
- Use your yarn needle to carefully weave in every loose yarn tail. Go in different directions for security and hide them within the stitches.
8. Blocking (Highly Recommended)
- Gently wet the finished skirt (or steam it lightly).
- Lay it flat on a clean surface or blocking mats. Gently shape it to the correct dimensions, smoothing out any unevenness.
- Allow it to air dry completely. Blocking helps to even out your stitches, improve the drape, and make the colors pop.
Tips for a Successful Striped Skirt
- Consistent Color Changes: Practice the technique of changing colors on the last yarn over of the joining slip stitch for a clean look.
- Weave in as you go: While tempting to leave all ends until the end, weaving in the ends of each color as you finish with it can save you from a daunting task later.
- Stripe Order: If using multiple colors, plan your stripe order beforehand to ensure a pleasing flow.
- Yarn Tension: Try to maintain consistent tension, especially when switching colors, to avoid puckering or loose spots.
- Safety: Always double-check that the elastic is securely sewn and hidden, and that there are no loose threads that could be a hazard.
Enjoy making this vibrant and practical striped skirt for a special little one!
Watch video: