 by
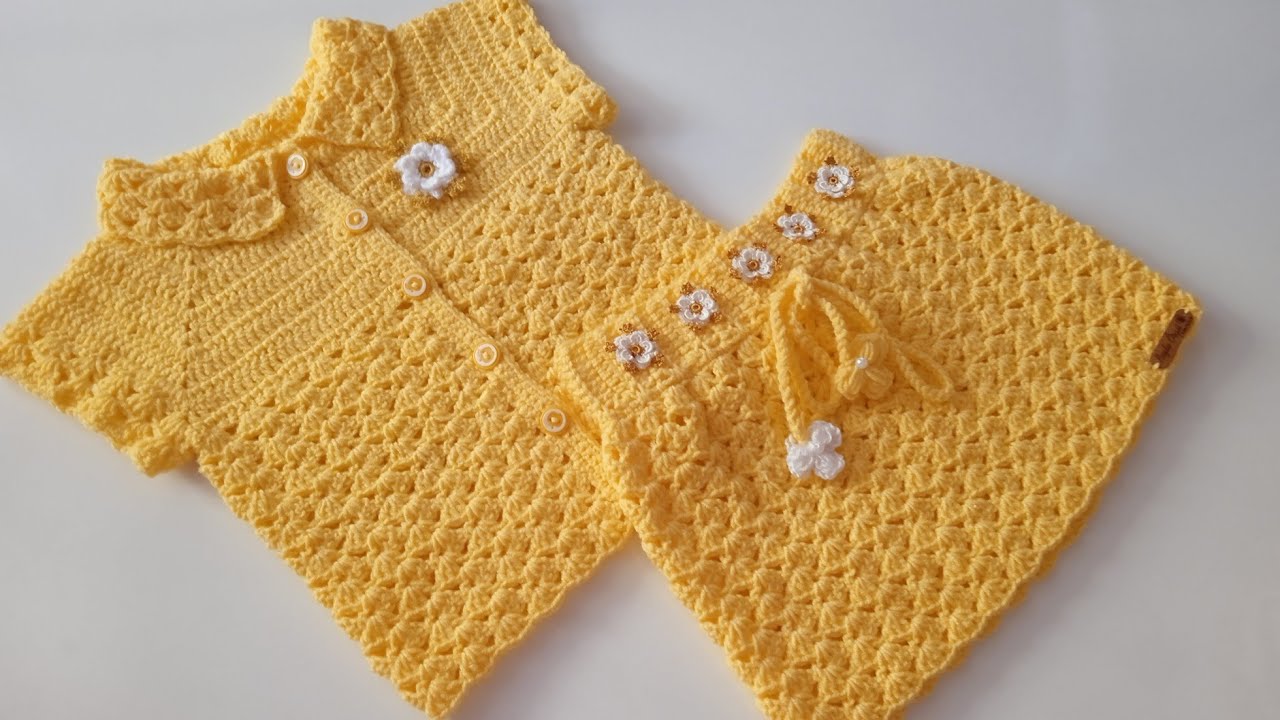
by Making a crochet skirt for a 2 to 3-year-old can be a delightful and relatively quick project, even for beginners. The key is to use simple stitches, a straightforward construction, and to incorporate an elastic waistband for comfort and fit.
Here’s a detailed guide on how to make an easy and simple crochet children’s skirt for a 2-3 year old:

Understanding the Basics for an Easy Child’s Skirt
For an easy skirt, we’ll generally aim for:
- Top-Down Construction: This means you start at the waist and work your way down. It makes it easy to adjust the length as you go.
- Working in the Round: This avoids seams, making the skirt more comfortable for a child and reducing finishing work.
- Simple Stitches: Single Crochet (sc), Half Double Crochet (hdc), and Double Crochet (dc) are perfect.
- Elastic Waistband: This provides a snug, comfortable fit and allows for some growth.
Measurements for a 2-3 Year Old Skirt
While patterns will give specific stitch counts, it’s good to have general measurements in mind for a 2-3 year old to ensure a good fit.
- Waist Circumference: Approximately 19-21 inches (48-53 cm) unstretched. The elastic will make it fit comfortably.
- Skirt Length: Approximately 9-11 inches (23-28 cm) from waist to hem.
Important: Always refer to the specific pattern you choose for exact measurements and stitch counts. Children’s sizes can vary.
Materials You’ll Need
- Yarn:
- Fiber: Soft, washable yarn is crucial for children’s clothing. Acrylic or cotton/cotton blends are excellent choices as they are durable and easy to care for.
- Weight: Light Worsted (DK / weight 3) or Worsted Weight (Aran / weight 4) yarn is ideal for skirts, offering good drape without being too heavy or too thin.
- Quantity: 1-2 skeins, depending on the yarn weight and desired length/fullness. Check your pattern for specifics.
- Color: Choose any color(s) you like! A solid color is simplest, or you can do stripes.
- Crochet Hook:
- Size: The yarn label will recommend a size, but your pattern will specify the exact hook. Common sizes for DK/Worsted yarn are 4.0mm (G/6) to 5.5mm (I/9).
- Elastic:
- Type: 3/4 inch (2 cm) or 1 inch (2.5 cm) wide non-roll elastic is recommended.
- Length: Cut a piece approximately 1-2 inches (2.5-5 cm) shorter than the child’s actual waist measurement (e.g., if their waist is 20 inches, cut 18-19 inches of elastic). This ensures a snug but comfortable fit.
- Scissors: For cutting yarn and elastic.
- Yarn Needle (Tapestry Needle): Essential for weaving in ends and seaming the elastic.
- Measuring Tape: For checking gauge, waist circumference, and length.
- Stitch Marker: Helpful for marking the beginning of rounds.
- Sewing Needle and Thread (matching elastic): For sewing the elastic ends together.
Essential Crochet Stitches for this Project
Ensure you are comfortable with these:
- Chain (ch): The foundation.
- Slip Stitch (sl st): For joining rounds.
- Single Crochet (sc): A dense, sturdy stitch.
- Half Double Crochet (hdc): A good intermediate height stitch.
- Double Crochet (dc): A taller, looser stitch that works up quickly.
Step-by-Step Guide to Making the Skirt
This guide will walk you through a common “top-down” construction with an integrated elastic waistband.
1. Choose Your Pattern and Yarn
- Look for patterns specifically labeled “easy,” “beginner,” or “simple” for a 2-3 year old. Websites like Ravelry, Pinterest, LoveCrafts, and many crochet blogs offer free patterns.
- Select your yarn based on softness, washability, and color preference.
2. Make a Gauge Swatch (Crucial!)
Do NOT skip this step! It determines the final size of your skirt.
- Using your chosen yarn and hook, crochet a small square (e.g., 4×4 inches / 10×10 cm) in the main stitch pattern your skirt will use (often double crochet or half double crochet).
- Measure how many stitches and rows you have within a 4-inch (10 cm) square.
- Adjust your hook size if your swatch is too large (go down a hook size) or too small (go up a hook size) until your gauge matches the pattern’s recommendation.
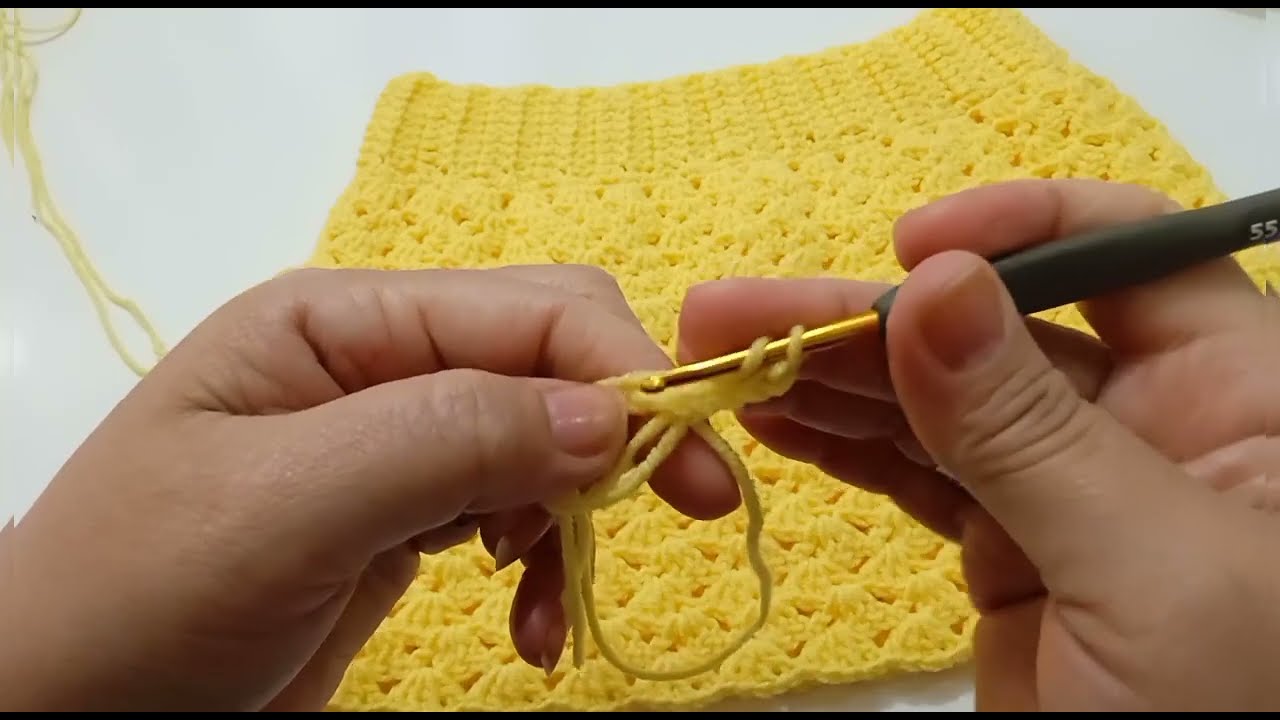
3. Create the Waistband (Casing for Elastic)
This is usually worked first.
- Determine Starting Chain: The number of chains will depend on your gauge and the desired waist size.
- Option 1: Follow Pattern: Most patterns will tell you exactly how many chains to make for a specific size.
- Option 2: Measure: Chain a length that, when joined, comfortably fits around the child’s waist without stretching it. Make sure the number of chains is suitable for your chosen stitch pattern (e.g., an even number for some stitch patterns, or a multiple of a certain number).
- Join the Chain: Carefully join the chain with a slip stitch to the first chain, making sure it’s not twisted. This forms the opening of the skirt.
- Work Waistband Rows/Rounds:
- Round 1: Chain up (e.g., ch 1 for sc, ch 2 for hdc, ch 3 for dc), then work 1 stitch into each chain around. Join with a slip stitch.
- Subsequent Rounds: Continue working in rounds using simple stitches (e.g., sc, hdc, or dc) to create a fabric tube for the elastic casing. The height of this tube should be slightly more than double the width of your elastic (e.g., if using 1-inch elastic, make the casing about 2.5 inches tall). This allows you to fold it over to create the casing.
- Common Method: Some patterns will have you make a rectangle first, then seam it. For simplicity, working in the round from the start is often easier.
- Adding Elastic Directly (More Advanced): Some patterns instruct you to crochet around the elastic as you make the first row of the waistband. This creates a very secure waistband, but it can be trickier for beginners. For a first skirt, the casing method is simpler.
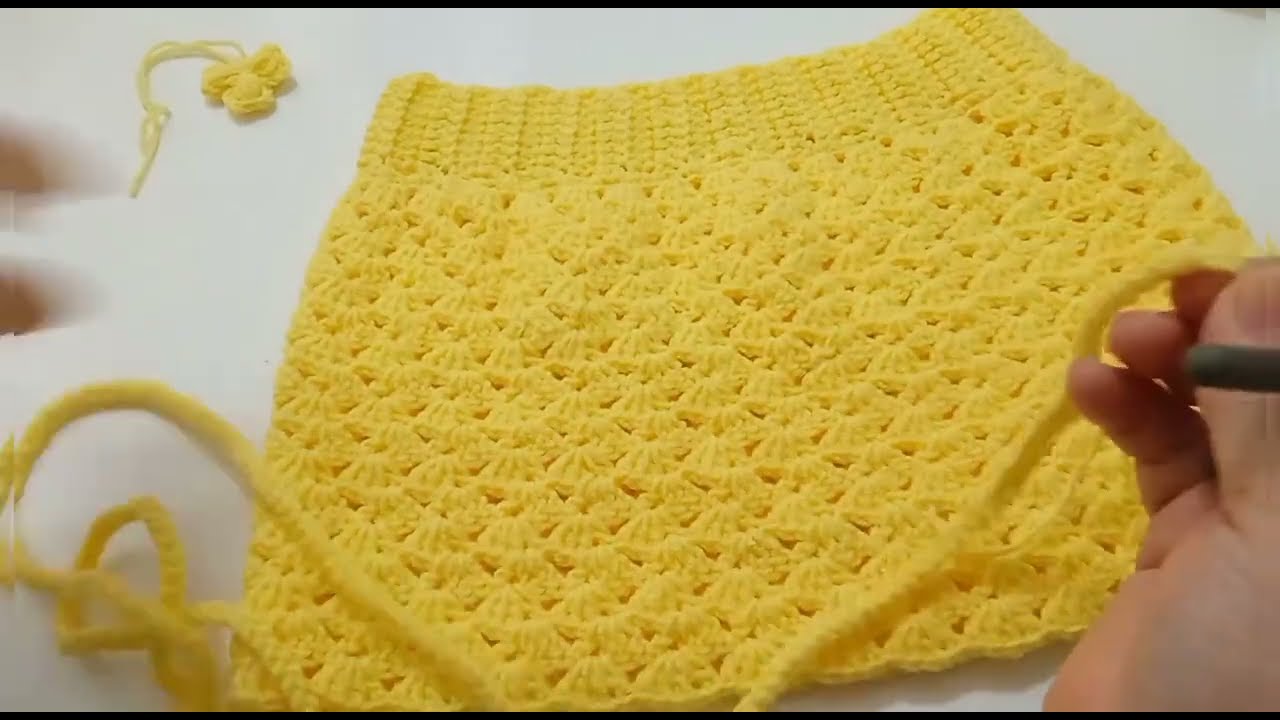
4. Create the Skirt Body
Once the waistband casing is complete, you’ll start shaping the skirt.
- Begin the Skirt: The pattern will usually instruct you to work into the other side of the initial chain or continue directly from the waistband rounds.
- Increasing for Flare: To give the skirt fullness and allow for movement, you’ll need to increase stitches as you work down.
- Gradual Increases: For a gentle A-line shape, you might increase a small number of stitches evenly around every 3-5 rounds. For example, in a round, you might work
*sc in next 5 sts, 2 sc in next st*repeated around. - Clusters/Shells: Using stitch patterns like shell stitches or V-stitches naturally creates more flare as they are wider than single stitches. These are also great for a pretty look.
- Gradual Increases: For a gentle A-line shape, you might increase a small number of stitches evenly around every 3-5 rounds. For example, in a round, you might work
- Stitch Pattern: You can continue with a basic stitch (like double crochet) or introduce a simple stitch pattern (e.g., repeating
ch 1, skip 1, dcfor a lacy look, or a simple shell pattern). - Length: Continue crocheting in rounds, adding increases as directed by your pattern, until the skirt reaches the desired length for a 2-3 year old (approx. 9-11 inches / 23-28 cm).
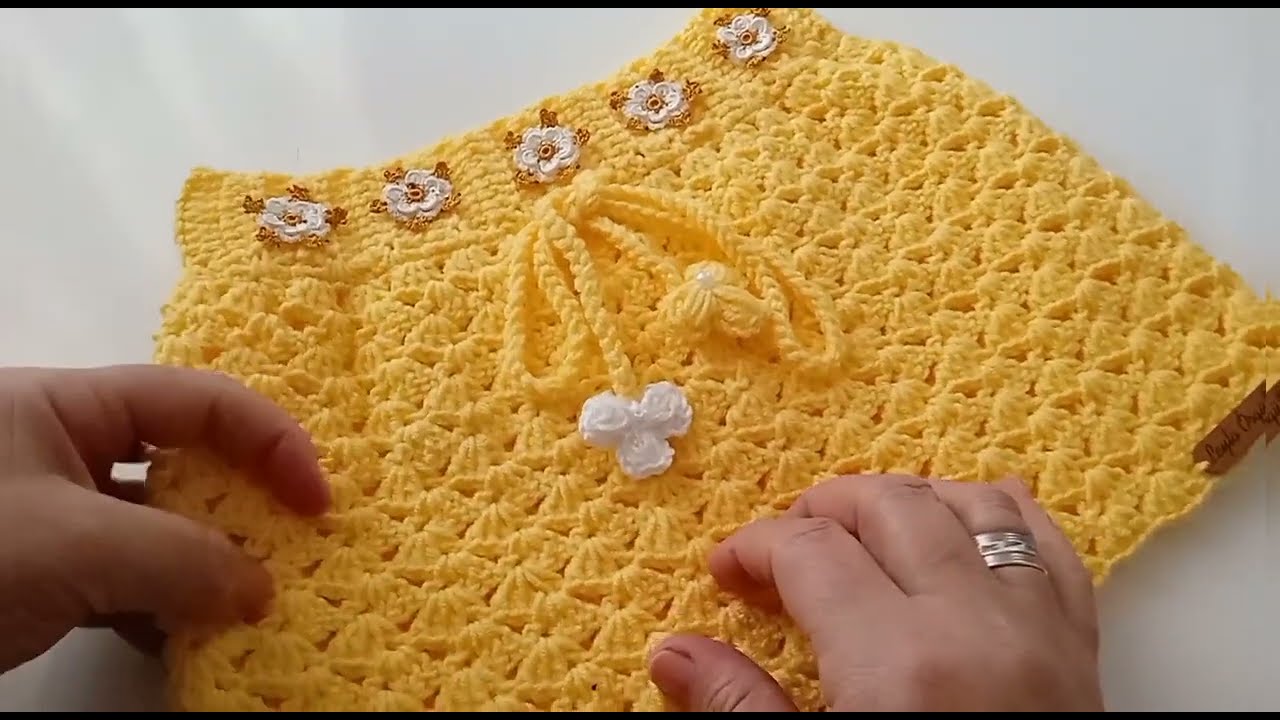
5. Finishing the Hem (Optional)
- You can leave the bottom edge as is, or add a simple border.
- Simple Border Ideas:
- A few rounds of single crochet (sc).
- A round of shell stitches (
(2 dc, ch 1, 2 dc) in same stitch, skip 2 stitches) for a pretty scalloped edge. - A picot edge (
sc, (ch 3, sl st into first ch), screpeated).
6. Add the Elastic Waistband
This is how you make the skirt adjustable and stay up!
- Prepare Elastic: Cut your elastic to the appropriate length (1-2 inches smaller than the child’s waist). Overlap the ends by about 0.5-1 inch (1-2.5 cm) and securely sew them together, forming a loop. Use a strong sewing thread and a zigzag stitch if sewing by machine, or several strong hand stitches.
- Create Casing (if not done in step 3): If your skirt design doesn’t have an integrated casing from the start, you’ll need to create one. This usually involves folding over the top edge of your crocheted waistband and stitching it down, leaving a small opening.
- Insert Elastic: Using a safety pin attached to one end of the elastic, thread the elastic loop through the casing you created in the waistband. Be careful not to twist the elastic inside the casing.
- Close Opening: Once the elastic is threaded through, sew up the small opening in the casing with your yarn needle and matching yarn. The elastic will gather the fabric, creating the waistband.
7. Weave in All Ends
- Using your yarn needle, carefully weave in all loose yarn tails. This creates a neat and professional finish and prevents the work from unraveling.
8. Blocking (Optional but Recommended)
- Gently wet the finished skirt (or steam it) and lay it flat to dry, shaping it to the correct dimensions. Blocking helps to even out your stitches and improve the drape of the fabric.
Tips for Beginners
- Watch Tutorials: If you’re new to any stitch or technique (like working in the round or changing colors), search for video tutorials online.
- Use a Stitch Marker: Always place a stitch marker in the first stitch of each round, especially if you are working in a spiral or if your joining stitches are hard to see.
- Count Your Stitches: It’s tedious, but counting your stitches at the end of each round (or every few rounds) prevents frustration later on.
- Don’t Be Afraid to Undo: If you make a mistake, it’s okay to “frog” (unravel) your work and redo it. It’s part of the learning process.
- Choose a Simple Yarn: Avoid very textured or fuzzy yarns for your first garment, as they can hide stitches and make it harder to see where you’re working.
- Practice: The more you crochet, the more comfortable and consistent your stitches will become.
By following these detailed steps, you can create a charming and practical crochet skirt for a 2 to 3-year-old child!
Watch video: