by
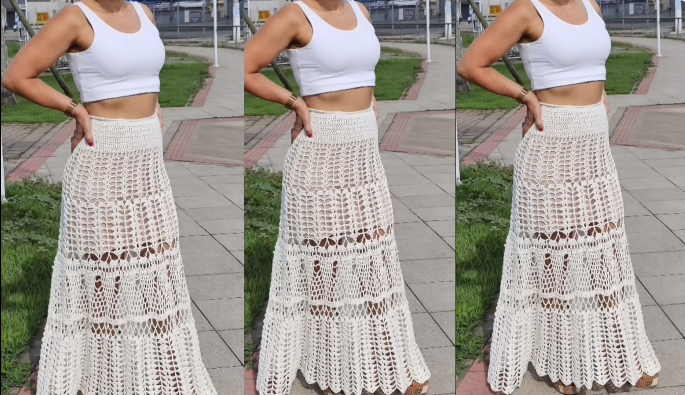
by Making a long crochet skirt can be a fun and rewarding project, especially if you love the art of crocheting. The process typically involves choosing the right materials, deciding on a pattern, and then following a series of crochet techniques. Below, I’ll walk you through the steps to create your own long crochet skirt from start to finish.

Materials You’ll Need:
-
Yarn:
-
Choose a yarn that’s comfortable to wear, especially if the skirt will be in direct contact with your skin. Cotton or bamboo yarns are breathable and suitable for warm weather, while wool blends are better for cooler seasons.
-
Make sure to get the right thickness (usually a medium-weight yarn like worsted or DK weight) based on your desired skirt style and the crochet pattern you plan to follow.
-
-
Crochet Hook:
-
Select the hook size that matches the yarn weight. This is usually indicated on the yarn label. For example, a 5mm hook (H-8) is commonly used for worsted weight yarn.
-
-
Measuring Tape:
-
This is essential for measuring your waist and desired skirt length.
-
-
Stitch Markers:
-
These will help you keep track of your rows and prevent mistakes.
-
-
Tapestry Needle:
-
Used to weave in loose ends at the end of your project.
-
-
Elastic Band (Optional):
-
If you want a stretchy waistband, you can insert an elastic band.
-

Step-by-Step Guide to Making a Long Crochet Skirt:
1. Take Measurements
-
Waist: Measure around your natural waist to get the circumference.
-
Hip: If you want the skirt to be fitted at the hips before flaring out, measure around the fullest part of your hips.
-
Skirt Length: Measure from your waist down to the desired length of the skirt (e.g., ankle-length, mid-calf, or floor-length).
Write down these measurements so you have them handy while crocheting.

2. Choose a Pattern
You can either follow a pre-existing pattern or create your own. Here are some basic ideas for different styles of crochet skirts:
-
A-Line Skirt: This type of skirt gradually increases in size from the waist to the hem. You can achieve this by using increases in every row or after a certain number of rows.
-
Straight Skirt: A simple, straight-down design where you don’t increase as you crochet. The pattern remains the same width throughout the entire skirt.
-
Fitted Skirt: This style requires some shaping through increases at specific intervals to ensure the skirt hugs the body.
3. Start with the Waistband
-
If you want a more structured waistband, crochet a few rows of single crochet (SC) or a ribbed stitch like the front post double crochet (FPDC) to give it some elasticity.
-
Alternatively, create a piece that fits snugly around your waist (this will be the foundation chain). A common way to start is to crochet a chain that fits the waist measurement, plus a small amount for stretch.
For example:
-
Chain a length that’s 3-4 inches smaller than your waist measurement (to allow for stretch and shaping).

4. Begin Crocheting the Skirt Body
-
Once you have the waistband, you can start working on the body of the skirt. Most skirts are crocheted in the round, meaning you’ll join your rows at the end and work continuously.
-
Start by joining the chain into a ring (taking care not to twist it) and crocheting in the round.
-
To create the A-line or flared shape, you’ll need to increase your stitches. A common way to do this is by crocheting two stitches in the same stitch every few rows.
-
Use double crochet (DC) or half double crochet (HDC) stitches for a light and airy fabric, or single crochet (SC) for a denser fabric.
For example:
-
Row 1: Crochet into the ring, making 10-12 SC, join with a slip stitch.
-
Row 2: Work 2 SC in each stitch (doubling the number of stitches).
-
Continue increasing every other row, depending on how wide you want the skirt to be.
5. Increase Rows for Shape
-
For a flared skirt, continue increasing in each round until you reach the desired width. The increases should be placed evenly around the circle (for example, every 5th or 6th stitch).
-
If you want a straight skirt, keep the same stitch count for the entire body of the skirt with no increases.
6. Crochet Until You Reach the Desired Length
-
Continue crocheting in rounds until you reach the desired length. You may need to add more increases depending on your pattern.
-
If you’re making a maxi skirt, you may want to add extra rows to make it floor-length.
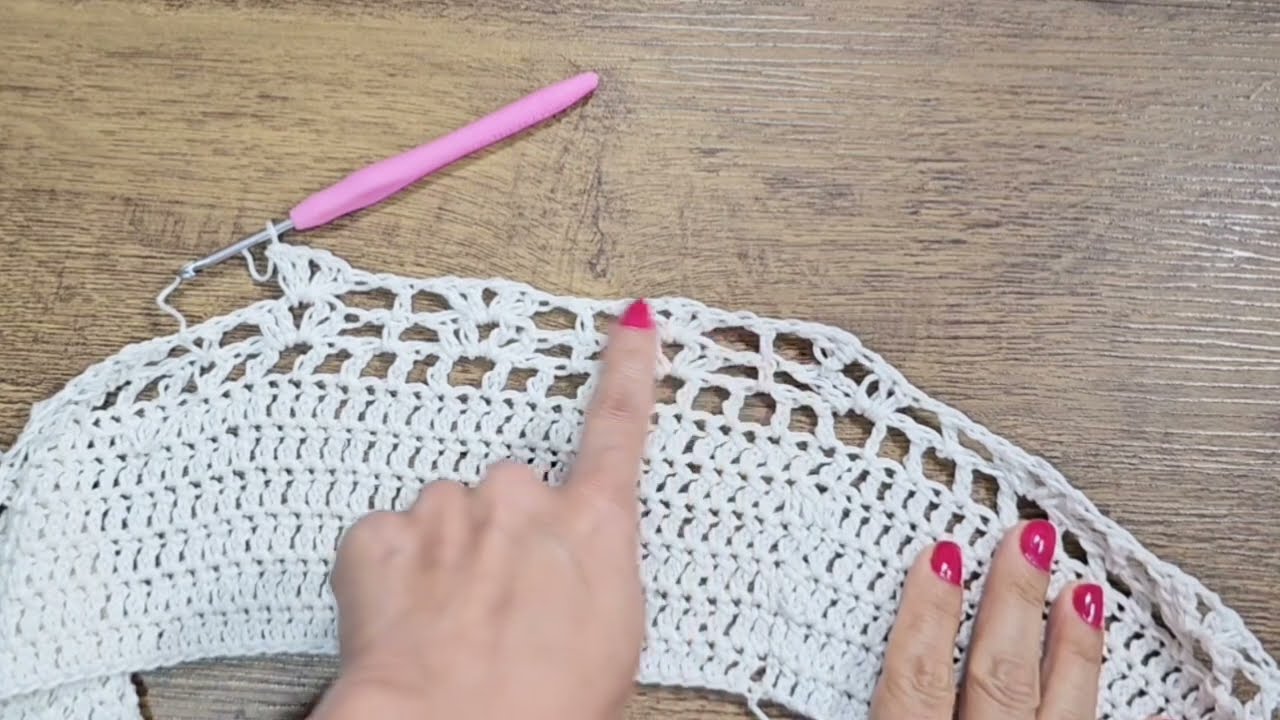
7. Finishing the Skirt
-
Once you’ve reached the desired length, you can start the finishing process.
-
Add a border or decorative edging at the bottom for a neat finish. Some options include a picot stitch, shell stitch, or simple SC or DC for a clean look.
8. Add the Waistband (Optional)
-
If you haven’t done so already, you can add a waistband at this point. If you prefer a stretchy waistband, thread an elastic band through the top of the skirt and secure it with a few stitches.
To add an elastic waistband:
-
Take a piece of elastic that fits your waist measurement.
-
Fold over the top edge of the skirt and crochet a casing large enough to hold the elastic.
-
Thread the elastic through the casing and sew the ends together.
9. Weave in Ends
-
Use a tapestry needle to weave in any loose ends from your yarn, making sure the threads are hidden inside the stitches.
Tips for Success:
-
Practice Swatches: If you’re new to crocheting, make a swatch first to ensure your tension is consistent. This will also help you estimate how much yarn you need.
-
Stitch Variation: Don’t be afraid to experiment with different crochet stitches for the skirt, like using shell stitches or clusters for texture.
-
Fit: Try the skirt on as you go to make sure it fits properly, especially if you’re designing your own pattern or modifying an existing one.
Conclusion:
Making a long crochet skirt is a process that involves basic crochet skills like chaining, double crochet, and increasing. Once you get the hang of it, you can create something truly unique, whether it’s a fitted skirt or a flowing, flared design.
What type of yarn and pattern were you thinking of using? Or are you still deciding?
Watch video: