 by
by Absolutely! Here’s a detailed, step-by-step guide for sewing a DIY tote bag with a front pocket, perfect for beginners or intermediate sewists. This sewing tutorial includes fabric recommendations, measurements, cutting instructions, and clear directions for assembly. It’s a comprehensive guide that you can follow to create a durable and stylish tote bag from scratch.
🧵 How to Sew a DIY Tote Bag with Front Pocket (Easy Sewing Tutorial + Pattern)
Creating your own tote bag is a satisfying and practical sewing project. Tote bags are incredibly versatile – perfect for groceries, books, beach gear, or everyday essentials. Adding a front pocket boosts functionality and gives your tote a polished, store-bought look.
This guide will walk you through everything you need to know to sew your own DIY tote bag with a front pocket, even if you’re relatively new to sewing!
✂️ Supplies and Materials
Before starting, gather the following supplies:
🧵 Materials Needed:
-
Main fabric (cotton canvas, denim, twill, or upholstery fabric) – ½ yard (for outer bag)
-
Lining fabric (quilting cotton or similar) – ½ yard
-
Contrasting fabric for front pocket – ¼ yard
-
Fusible interfacing (optional, for added structure) – ½ yard
-
Webbing or fabric for straps – two pieces, each 22″-24″ long (or make your own straps)
-
Matching thread
-
Fabric scissors or rotary cutter
-
Pins or clips
-
Ruler or measuring tape
-
Iron
-
Sewing machine
🧰 Finished Bag Dimensions:
-
Width: 14 inches (35.5 cm)
-
Height: 15 inches (38 cm)
-
Strap drop: ~10 inches (25.5 cm)
-
Front pocket: 8″ wide x 9″ tall (20 x 23 cm)
You can adjust the size to fit your needs, but this is a classic medium-size tote.
📐 Cutting Instructions
Here’s how to cut your fabric pieces:
From the main fabric (outer bag):
-
(2) rectangles – 15″ wide x 16″ tall (front and back)
From the lining fabric:
-
(2) rectangles – 15″ wide x 16″ tall (front and back lining)
From the contrasting/pocket fabric:
-
(1) rectangle – 9″ wide x 10″ tall (for front pocket)
For the straps:
-
(2) strips – 22″ to 24″ long and 1.5″ to 2″ wide (or use ready-made webbing)
Optional: Fusible interfacing
-
Cut interfacing the same size as the main fabric pieces and the pocket (if you want added sturdiness)
🪡 Step-by-Step Sewing Instructions
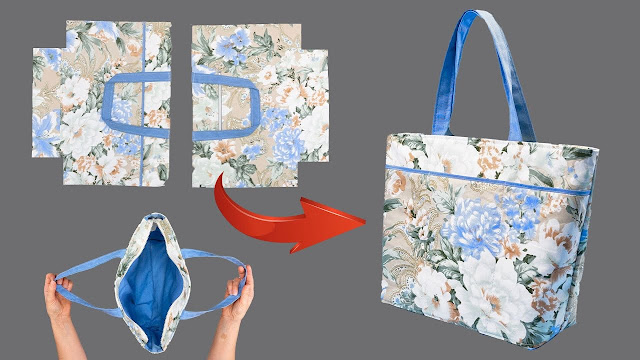
.jpg)
✅ Step 1: Prepare the Pocket
-
Fold the pocket fabric in half (right sides together), so the folded piece is now 9″ wide x 5″ tall.
-
Sew around the sides and bottom with a ¼” seam allowance, leaving a 2” gap at the bottom for turning.
-
Clip corners, turn right side out, and press flat.
-
Topstitch the top folded edge (the open side) about ⅛” from the edge to give it a finished look.
-
Position the pocket on one of the outer bag pieces (centered horizontally, about 4” down from the top).
-
Pin or clip the pocket in place.
-
Sew around the sides and bottom of the pocket, backstitching at the top corners to reinforce. Leave the top open.
✅ TIP: If you want to add extra compartments, sew a vertical line down the pocket to divide it.
✅ Step 2: Attach Interfacing (Optional)
If using fusible interfacing:
-
Iron interfacing to the wrong side of the outer bag pieces and pocket before assembling.
-
This helps the bag keep its shape and adds durability.
✅ Step 3: Sew the Outer Bag
-
Place the two outer fabric pieces right sides together.
-
Sew along the sides and bottom using a ½” seam allowance.
-
Optional: To create a flat bottom, box the corners:
-
With the bag still inside out, pinch each bottom corner into a triangle so that the side and bottom seams align.
-
Measure 2” from the point, draw a line across, and sew along the line.
-
Trim the triangle off, leaving a ¼” seam allowance.
-
✅ Step 4: Sew the Lining
-
Place the two lining fabric pieces right sides together.
-
Sew down the sides and bottom, BUT leave a 3-4 inch gap at the bottom – this will be used to turn the bag right side out later.
-
Box the corners the same way as the outer bag.
✅ Step 5: Assemble the Bag
-
Turn the outer bag right side out.
-
Leave the lining inside out.
-
Insert the outer bag into the lining, so the right sides are touching.
-
Align the side seams and top edges.
-
Pin or clip all around the top edge.
-
Sew all the way around the top with a ½” seam allowance.
✅ Step 6: Turn the Bag Right Side Out
-
Gently pull the outer bag through the gap in the lining.
-
Push the lining down into the bag and press the top edge.
-
Topstitch around the top edge (optional but recommended) about ⅛” from the edge for a clean finish and durability.
✅ Step 7: Attach the Straps
You have two options:
-
Use pre-made cotton webbing for straps.
-
Make your own fabric straps by folding long strips like bias tape and sewing them shut.
-
Measure and mark 3.5” in from each side seam along the top edge of the bag.
-
Place the ends of the straps at these marks, with about 1” of the strap inside the bag edge.
-
Make sure the straps aren’t twisted.
-
Sew a square or “X-box” at each end of the strap to secure it firmly.
-
Repeat for the second strap on the other side.

🧼 Final Touches
-
Press the bag thoroughly with an iron for a clean, finished look.
-
Close the gap in the lining by hand or with a machine stitch.
-
Optional: Add a magnetic snap or button closure if desired.
🎉 Done! You’ve Made a DIY Tote Bag with Front Pocket!
Congratulations! You now have a fully functional, handmade tote bag that’s:
-
Durable
-
Reusable
-
Customizable
-
And super handy for everyday use!
🪡 Ideas for Customizing Your Tote Bag
-
Add inner pockets for phones or keys
-
Use printed or patterned fabric for a unique look
-
Add embroidery or iron-on patches
-
Make a reversible tote bag
-
Use leather or faux leather for a more refined style
🧵 Final Thoughts
Sewing your own tote bag is not only eco-friendly but also a great way to practice basic sewing skills like straight stitching, topstitching, and creating boxed corners. The addition of the front pocket adds a touch of professionalism and functionality.
This pattern is beginner-friendly, and once you’ve made one, you’ll want to make more for gifts, shopping, or everyday use!