by
by This pattern is suitable for intermediate crocheters, or adventurous beginners comfortable with basic stitches, color changes, and seaming.
Yarn:
- DK (Double Knit) or Light Worsted Weight yarn in:
- Main Color (MC): Yellow, as pictured.
- Contrast Color 1 (CC1): Purple/Lavender, as pictured.
- Contrast Color 2 (CC2): White (for the flower), as pictured.
- Choose a soft, baby-friendly yarn that is machine washable for easy care.
Hook:
- 3.5 mm (US E/4) crochet hook (adjust hook size if necessary to achieve desired fabric and tension).
Notions:
- Tapestry needle for seaming and weaving in ends
- Scissors
- 2-3 small white pearls or beads (for the center of each flower, as pictured).
Gauge (Important for Sizing!):
- For the ribbed body (SC in BLO): 18 SC and 20 rows = 4 inches (10 cm).
- Always make a small swatch to check your gauge, as it’s crucial for the finished size of the slippers!
Size:
- Newborn to 3 months (approximately 3.75 – 4 inches / 9.5-10 cm sole length when finished).
- To adjust for larger sizes, you will need to increase the starting chain for the sole and add more stitches/rows for the upper body (adjusting the initial chain for the upper to be longer, and increasing rows for height).
Abbreviations (US Crochet Terms):
- Ch: Chain
- Sl St: Slip Stitch
- SC: Single Crochet
- HDC: Half Double Crochet
- St(s): Stitch(es)
- BLO: Back Loop Only (insert hook only into the back loop of the stitch)
- FO: Fasten Off
Pattern Instructions:
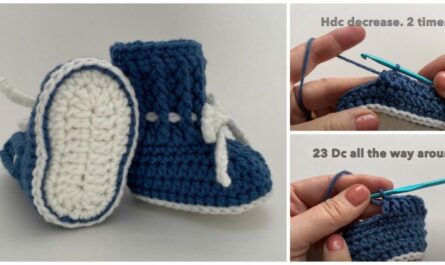
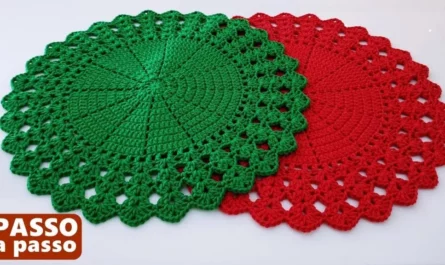
These slippers are made by first creating a flat rectangular piece for the upper, then shaping and seaming it, and finally attaching a separate sole and embellishments.
Part 1: The Main Body/Upper (Flat Piece – MC & CC1)
This rectangular piece forms the ribbed, striped sides and top of the slipper. The height of the piece will be the length around the foot, and the number of rows will be the height of the slipper.

- Starting with Main Color (MC – Yellow). Ch 20. (This chain determines the height of the slipper. Adjust for taller/shorter.)
- Row 1 (RS): SC in 2nd Ch from hook. SC in each Ch across. (19 SC). Ch 1, turn.
- Row 2 (WS): SC in BLO in each SC across. (19 SC). Ch 1, turn.
- Repeat Row 2 for 10 more rows using MC. (Total of 12 rows in MC).
- Change to Contrast Color 1 (CC1 – Purple): On the last loop of the last SC of Row 12, drop MC and pick up CC1. Ch 1, turn.
- Row 13 (CC1): SC in BLO in each SC across. (19 SC). Ch 1, turn.
- Repeat Row 13 for 2 more rows in CC1. (Total of 3 rows in CC1).
- Change back to Main Color (MC – Yellow): On the last loop of the last SC of the last CC1 row, drop CC1 and pick up MC. Ch 1, turn.
- Row 16 (MC): SC in BLO in each SC across. (19 SC). Ch 1, turn.
- Repeat Row 16 for 10 more rows in MC. (Total of 11 rows in MC after the purple stripe).
- Your flat piece should now have yellow, purple, and yellow stripes, with a ribbed texture. It should measure approximately 8.5-9 inches (21-23 cm) long and 4 inches (10 cm) high. FO, leaving a long tail for seaming.
Part 2: The Sole (Main Color – Yellow)
The sole is worked in continuous rounds to create an oval shape.

- Ch 14.
- Round 1: SC in 2nd Ch from hook. SC in next 11 Ch. 3 SC in last Ch. (Work around the end of the chain). Working along the other side of the starting chain: SC in next 11 Ch. 2 SC in the very last Ch (this is the same ch as your very first SC). Sl St to first SC to join. (28 SC)
- Round 2: Ch 1 (does not count as a stitch). 2 SC in first SC. SC in next 11 SC. 2 SC in next 3 SC. SC in next 11 SC. 2 SC in last 2 SC. Sl St to first SC to join. (34 SC)
- Round 3: Ch 1. 2 SC in first SC. SC in next 13 SC. 2 SC in next 3 SC. SC in next 13 SC. 2 SC in last 2 SC. Sl St to first SC to join. (40 SC)
- This completes the flat sole. FO, leaving a long tail for sewing.
Part 3: The Flower Embellishment (CC2 – White)
Make 2 flowers (one for each slipper), as pictured.

- Ch 2.
- Petals: Work (Sl St, Ch 2, 2 DC, Ch 2, Sl St) all into the 2nd Ch from hook. Repeat 4 more times into the same 2nd Ch from hook. (5 petals total).
- FO, leaving a short tail for weaving in.
- Each flower should look like a small, flat rosette.