 by
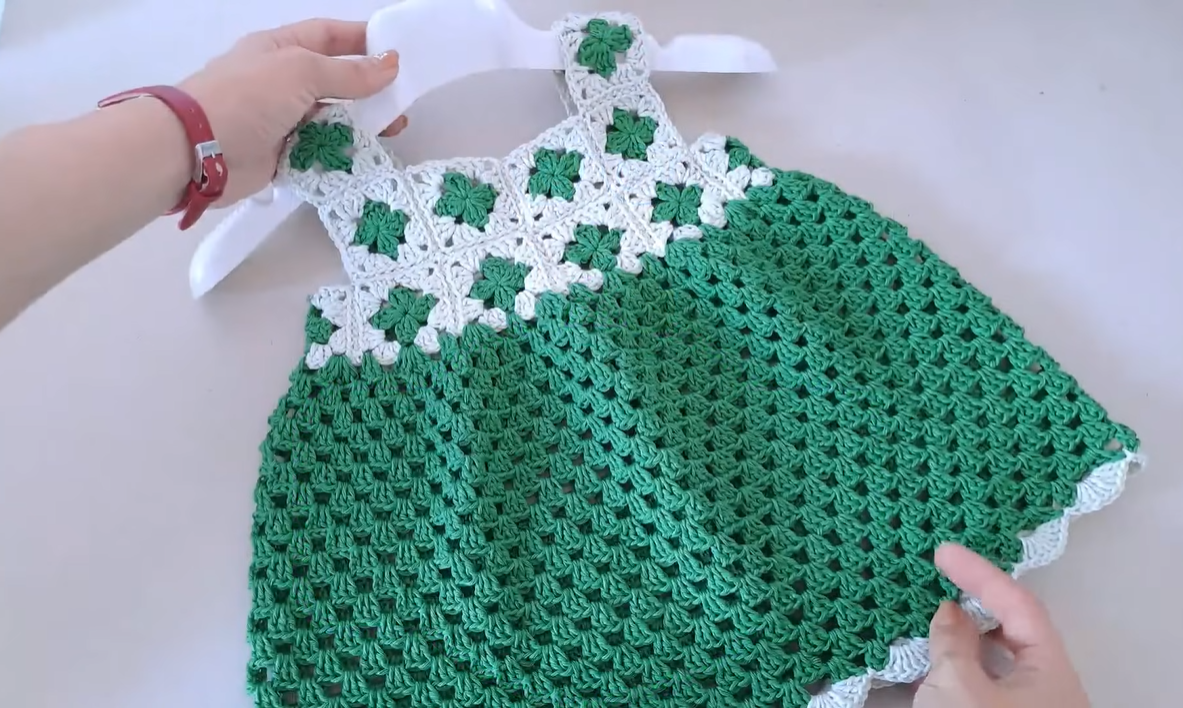
by Imagine your little one twirling in this adorable handmade crochet dress! This charming design features a unique square motif yoke that creates a beautiful neckline and straps, paired with a flowing shell stitch skirt. The contrast between the solid motifs and the lacy skirt makes for a truly special garment, perfect for warm weather or layering.
This pattern is ideal for intermediate crocheters or confident beginners who are comfortable joining motifs.
Yarn:
- DK (Double Knit) or Light Worsted Weight yarn in two contrasting colors (e.g., Green and White, as pictured). Choose a soft, baby-friendly yarn that is machine washable for easy care.
Hook:
- 3.5 mm (US E/4) crochet hook (adjust hook size if necessary to achieve gauge and desired fabric).
Notions:
- Tapestry needle for weaving in ends and joining motifs
- Scissors
- Small buttons (2-3, for the back closure)
- Stitch markers (helpful for keeping track of motif placement)
Gauge (Crucial for Sizing!):
- One square motif: Approximately 2.5 x 2.5 inches (6.5 x 6.5 cm).
- For the Skirt (Shell Stitch): A shell (5 DC) should be approximately 1.25 inches wide and 1 inch tall.
- Please make a gauge swatch of one motif and a small section of the skirt pattern to ensure your measurements match. Adjust hook size if needed.
Finished Measurements (Approximate for 6-12 Months):
-
- Chest Circumference: 19-20 inches (48-51 cm)
- Dress Length (from shoulder to hem): 15-16 inches (38-41 cm)
Abbreviations (US Crochet Terms):
- Ch: Chain
- Sl St: Slip Stitch
- SC: Single Crochet
- HDC: Half Double Crochet
- DC: Double Crochet
- Tr: Treble Crochet (or Triple Crochet)
- St(s): Stitch(es)
- Sk: Skip
- Sp: Space
- FO: Fasten Off
- Yo: Yarn Over
- Picot: Ch 3, Sl St into the first Ch.
- V-stitch: (DC, Ch 1, DC) in the same stitch/space
- Shell: 5 DC in the same stitch/space
- DC Cluster (dc-cl): Yo, insert hook into st/sp, Yo, pull up loop, Yo, pull through 2 loops (2 loops on hook); (Yo, insert hook into same st/sp, Yo, pull up loop, Yo, pull through 2 loops) 2 more times (4 loops on hook); Yo, pull through all 4 loops. (This forms a 3-DC Cluster).
Pattern Instructions:
Part 1: The Square Motif Yoke
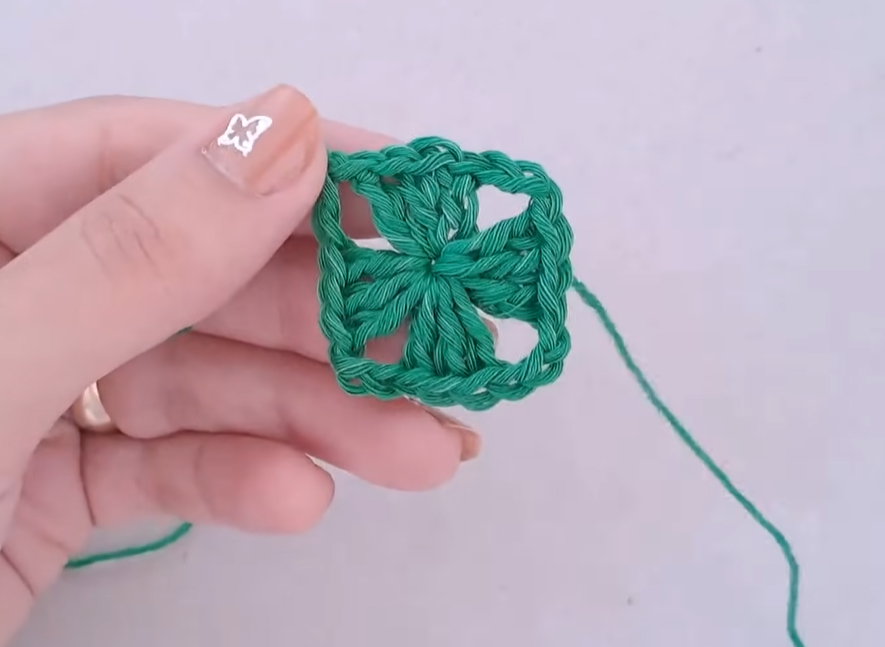
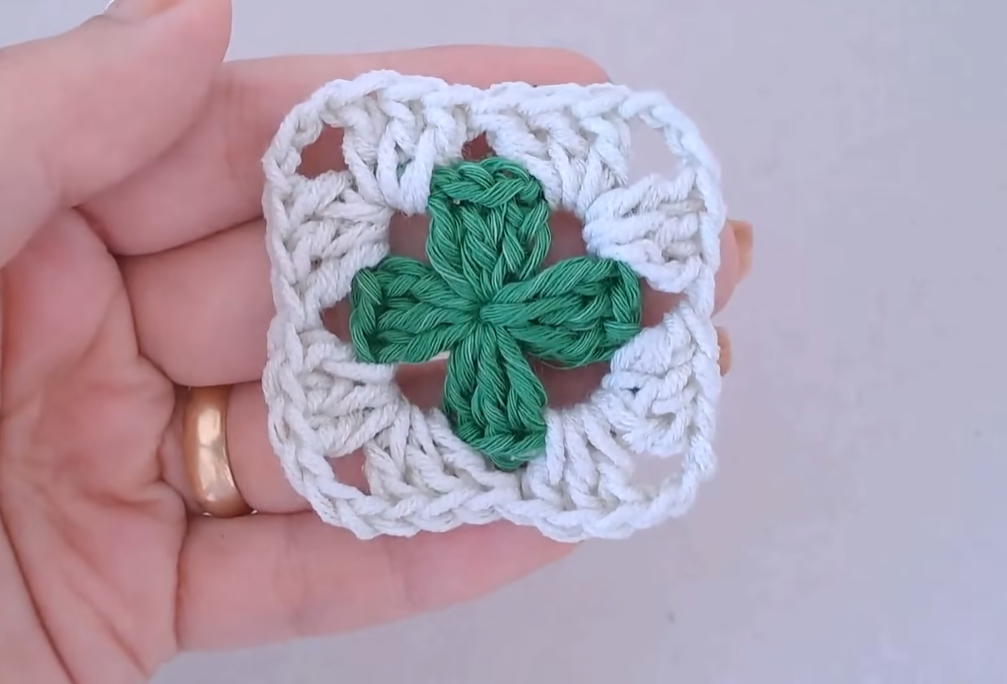
The yoke is made from individual squares joined together. Each square has a central “flower” design.
Motif Pattern (Make 12-14 in total for 6-12 months size):
- Make 8-10 motifs in White (for front/back/sides)
- Make 4 motifs in Green (for shoulder straps)
Start with Color A (Green for center, then White for outer rounds, OR White for center, then Green for outer rounds – as seen, the center of the ‘flower’ is green, then bordered by white). Let’s assume Green for center, White for outer rounds based on the image’s overall color distribution.
Round 1 (Green Yarn): Ch 4, Sl St to first Ch to form a ring. Ch 3 (counts as 1st DC). Work 15 DC into the ring. Sl St to top of beginning Ch 3. (16 DC)
Round 2 (Green Yarn): Ch 1. SC in next DC, Ch 3. Repeat from * to * around. Sl St to first SC. (16 Ch-3 loops) FO Green yarn.
Round 3 (White Yarn): Join White yarn with a Sl St into any Ch-3 loop. Ch 3 (counts as 1st DC). (DC, Ch 2, 2 DC) in the same Ch-3 loop (this forms your first corner). Sk next Ch-3 loop, (2 DC, Ch 2, 2 DC) in next Ch-3 loop. Repeat from * to * around. You will create 4 corners. Sl St to top of beginning Ch 3. (16 DC and 4 Ch-2 spaces)
Round 4 (White Yarn): Ch 3 (counts as 1st DC). DC in next DC. (2 DC, Ch 2, 2 DC) in next Ch-2 sp (corner). DC in next 4 DC. (2 DC, Ch 2, 2 DC) in next Ch-2 sp (corner). Repeat from * to * around. DC in remaining 2 DC. Sl St to top of beginning Ch 3. FO.
- Your motifs should now be square and measure approx. 2.5 x 2.5 inches.
- Note: The image shows a very specific type of motif. The provided pattern is for a common square flower motif. If the exact motif in the image is desired, a more advanced “puff stitch flower square” or “granny square flower” pattern would be needed.
- Alternative Motif for the Image’s Exact Look (more complex):
- Center (Green): Magic Ring, Ch 3, (DC-cl, Ch 2) 7 times. Sl St to top of first DC-cl. (8 clusters).
- Next Round (White): Sl St into first Ch-2 sp. Ch 3, (2 DC-cl, Ch 2) in same sp. (DC-cl, Ch 2, 2 DC-cl, Ch 2) in next sp. Continue forming corners with (2 DC-cl, Ch 2, 2 DC-cl, Ch 2) and sides with (DC-cl, Ch 2). This might be more accurate to the “starburst” appearance.
- For simplicity, I will continue with the standard flower square pattern above, which is a good approximation for a beginner-friendly blog post.
- Alternative Motif for the Image’s Exact Look (more complex):
Joining the Motifs:
Arrange your motifs:
- Front: 4 white motifs in a row.
- Back: 4 white motifs in a row.
- Straps: 2 green motifs for each shoulder (4 total green motifs).
- Sew/Crochet Join: Join the motifs using a whip stitch (tapestry needle) or a slip stitch/SC join (crochet hook).
- Join the 4 front motifs side-by-side.
- Join the 4 back motifs side-by-side.
- For the straps, join 2 green motifs together to form a strip. Make two of these.
- Assemble the Yoke:
- Lay out the front row of motifs.
- Attach one end of a green strap strip to the top corner of the first front motif.
- Attach the other end of that strap strip to the top corner of the last front motif.
- Repeat for the second green strap.
- Now, attach the front motif row to the back motif row, connecting the side edges of the front/back motifs. Leave a gap in the center of the back for buttons (approx. 2 motifs wide).
- Attach the loose ends of the green straps to the top corners of the back motifs.
- You should have a square/rectangular yoke formed by 8 white motifs (front and back) and 4 green motifs (straps), with armholes and a neck opening.
Part 2: The Skirt (Green & White)
We’ll use a Shell Stitch pattern (5 DC in the same stitch, skip 4 stitches).
- Round 1 (Green Yarn): Join Green yarn with a Sl St to any corner of the bottom edge of your yoke (where the white motifs meet). Ch 3 (counts as 1st DC). 4 DC in the same stitch/space (first Shell made).
- You need to ensure your stitch count around the bottom of the yoke is a multiple of 5 for the shells. You may need to adjust by skipping 3 or 5 stitches occasionally, or adding extra stitches evenly around, to make it work.
- Alternatively, you can work a foundation round of DC stitches evenly spaced around the bottom of the yoke, aiming for a multiple of 5, then start your shells into those DC stitches.
- *Let’s assume you’ve made a foundation round of DC. Work a Shell (5 DC) in the next appropriate stitch. Sk 4 stitches, Shell (5 DC) in next stitch. Repeat from * to * around. Sl St to top of beginning Ch 3.
- Round 2: Sl St into the center DC of the first Shell. Ch 3, 4 DC in the same center DC (first Shell made). Sk 4 DC, Shell (5 DC) in the center DC of the next Shell. Repeat from * to * around. Sl St to top of beginning Ch 3.
- Repeat Round 2 for 15-18 more rounds (or until the green section of the skirt measures approx. 9-10 inches / 23-25 cm from the join, or desired length for a 6-12 month baby).
Skirt Edging (White Yarn):
- Change to White Yarn: Join White yarn with a Sl St into the center DC of any shell.
- Round 1 (White Edging): Ch 1. SC in the center DC of the current shell, (Ch 2, SC in the space between the current shell and the next shell, Ch 2). Repeat from * to * around. Sl St to first SC.
- Round 2 (Picot Edge): Ch 1. SC in the first SC, (SC in next Ch-2 sp, Picot (Ch 3, Sl St into 1st Ch), SC in same Ch-2 sp). Repeat from * to * around. Sl St to first SC. FO.

Part 3: Finishing Touches
-
- Weave in all loose ends neatly with your tapestry needle.
- Back Closure:
- For the back opening of the yoke, you may need to add a simple SC border along each side of the opening to create a clean edge and buttonholes.
- Along one side of the back opening: SC evenly up the edge.
- Along the other side: SC evenly up the edge. On the way back down, work (Ch 2, Sk 2 SC, SC) for your buttonholes. Make 2-3 buttonholes evenly spaced.
- Sew 2-3 small buttons onto the opposite side of the back opening to align with your buttonholes.
- Block (Optional but Recommended): Gently wet the dress, reshape it to the correct measurements, and pin it to a foam board or towel. Allow it to air dry completely. This will open up the stitches and give the dress a beautiful drape and professional finish.