 by
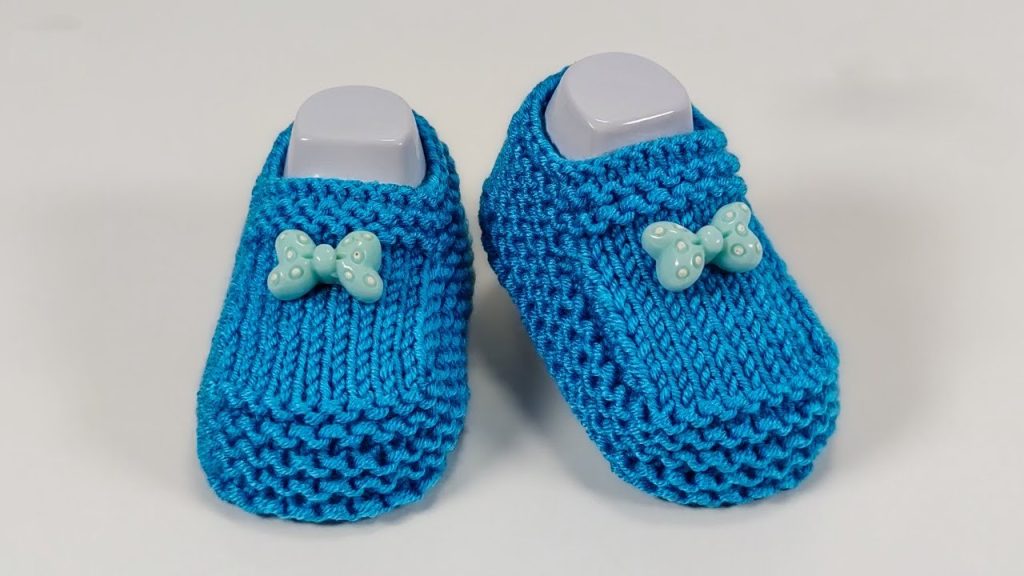
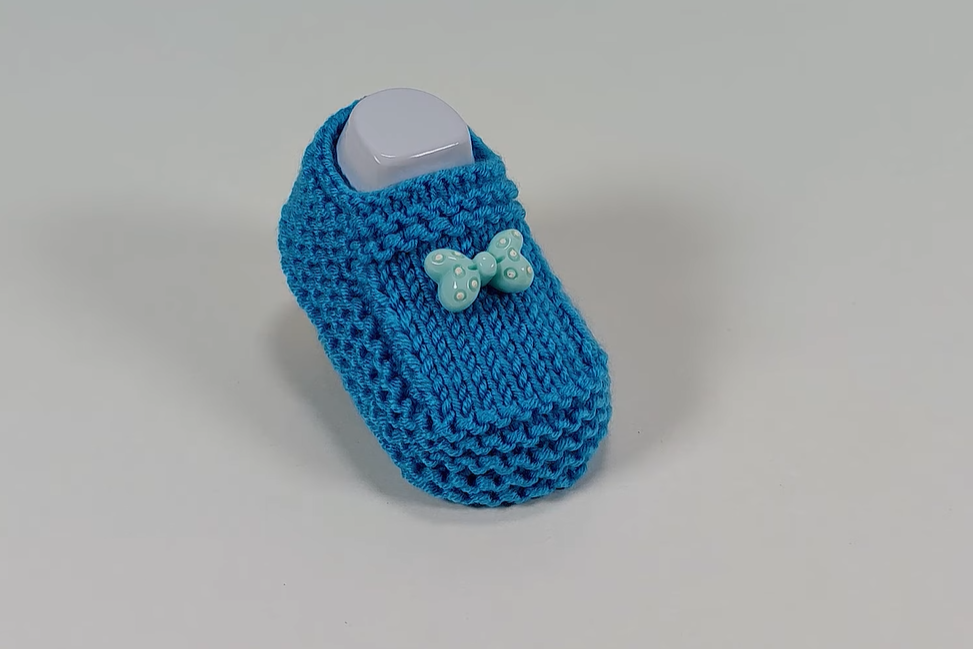
by Welcome, knitters! Craft the coziest little shoes with this pattern for the Little Skipper Booties. This classic design features a soft, cushioned Garter Stitch body and sole, which is ideal for a baby’s delicate feet, and a classic, neat shape that ensures they stay put. The shape is achieved through a simple “T-shaped” construction worked flat and meticulously seamed.
This comprehensive pattern is written for two popular infant sizes and includes guidance on construction and customization.
 Sizing and Fit Guide
The following instructions cover two sizes. The finished bootie is designed for a comfortable, snug fit.
| Size | Age (Approx.) | Foot Length (Approx.) |
| Newborn (Instructions in Parentheses) | 0 – 3 Months | 3 – 3.5 inches (8 – 9 cm) |
| Infant (Instructions Without Parentheses) | 3 – 6 Months | 3.5 – 4 inches (9 – 10 cm) |
Export to Sheets
 Materials Needed
- Yarn: Approximately 75 – 100 yards (70 – 90 meters) of a soft DK weight (light worsted/8-ply) yarn in your main color (Skipper Blue).
- Select a yarn that is machine washable, as this is ideal for baby garments.
- Needles: A pair of US size 5 (3.75 mm) straight knitting needles.
- Using a slightly smaller needle helps create the dense, warm fabric needed for booties.
- Notions:
- Tapestry Needle for robust seaming and weaving in ends.
- Sharp Scissors.
- 2 Decorative Bows or 2 small buttons for the embellishment.
 Gauge (Vital for Accurate Sizing)
- Gauge: 22 stitches and 44 rows (22 garter ridges) equals 4 inches (10 cm) in Garter Stitch.
- Note: Checking your gauge is critical. Slight differences in tension can significantly impact the finished size of baby items.
 Key Techniques & Abbreviations
This pattern is worked entirely flat using basic stitches and simple shaping techniques.
- K = Knit
- st(s) = Stitch(es)
- RS = Right Side
- WS = Wrong Side
- K2tog = Knit two stitches together (a decrease).
- ssk = Slip, Slip, Knit (a decrease).
- M1 = Make 1 (a simple increase).
- Garter Stitch: Knit every row.
 The Pattern: Little Skipper Booties
Work all instructions for Size Infant (3-6 Months). Use the numbers in the (parentheses) for Size Newborn (0-3 Months).
 The Base Strip (Toe to Heel)
This strip forms the core of the bootie, including the toe shaping and the sole structure.
| Step | Instructions | Stitch Count |
| Cast On | Cast on 37 (33) stitches loosely. | 37 (33) sts |
| Rows 1–10 | Work in Garter Stitch (Knit every row) for 10 rows. This forms the rounded toe end. | 37 (33) sts |
| Row 11 (RS) | K2tog, K to the last 2 sts, ssk. | 35 (31) sts |
| Row 12 (WS) | Knit all stitches. | 35 (31) sts |
| Rows 13–16 | Repeat Rows 11 and 12 twice (4 rows total). | 31 (27) sts |
| Rows 17–28 (17–26) | Continue working in Garter Stitch (Knit every row) for 12 (10) rows. This creates the main sole section. | 31 (27) sts |

 The Sides (The Cuff Flaps)
Increases are worked to create the side flaps that will wrap around the ankle to form the cuff.
| Row | Instructions | Stitch Count |
| Row 29 (27) (RS) | K 1, M1, K to the last st, M1, K1. | 33 (29) sts |
| Row 30 (28) (WS) | Knit all stitches. | 33 (29) sts |
| Rows 31–36 (29–34) | Repeat Rows 29 (27) and 30 (28) three times (6 rows total). | 39 (35) sts |
| Row 37 (35) (RS) | K 1, M1, K to the last st, M1, K1. | 41 (37) sts |
| Rows 38–44 (36–42) | Continue working in Garter Stitch for 7 rows. This is the full width of the cuff flaps. | 41 (37) sts |
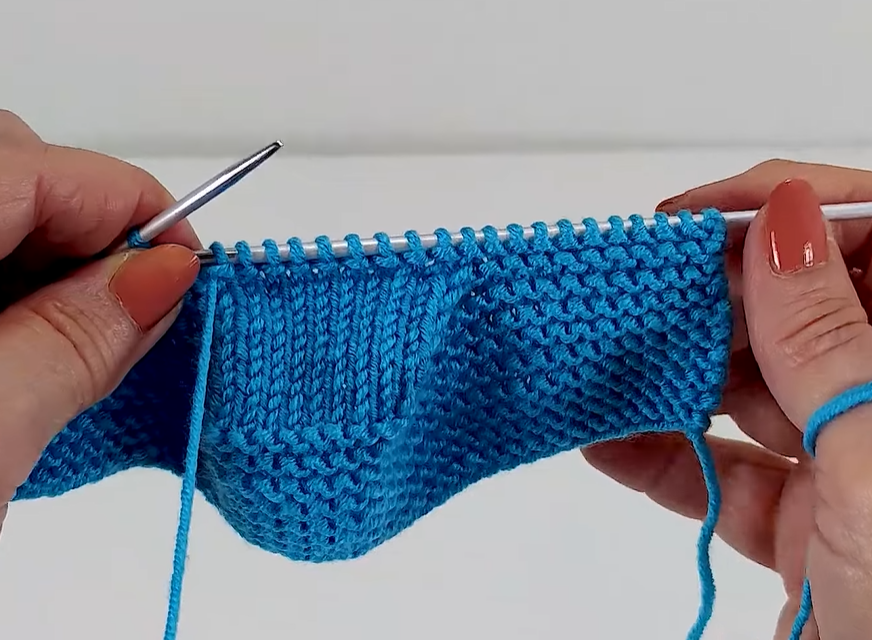
 Central Bind Off and Ankle Opening
We create the opening for the foot by binding off central stitches and then casting them back on immediately to create a neat border.
| Row | Instructions | Stitch Count |
| Row 45 (43) (RS) | K 14 (12) sts. Bind off 13 (13) stitches loosely. K the remaining 14 (12) sts. | 28 (24) sts |
| Row 46 (44) (WS) | K 14 (12) sts. Cast on 13 (13) stitches over the bound-off gap. K the remaining 14 (12) sts. | 41 (37) sts |
| Rows 47–56 (45–54) | Continue working in Garter Stitch for 10 rows. This stabilizes the opening edge. | 41 (37) sts |
 Final Heel Shaping
The last few rows shape the top of the heel before the final bind-off and seaming.
| Row | Instructions | Stitch Count |
| Row 57 (55) (RS) | K2tog, K to the last 2 sts, ssk. | 39 (35) sts |
| Row 58 (56) (WS) | Knit all stitches. | 39 (35) sts |
| Rows 59–64 (57–62) | Repeat Rows 57 (55) and 58 (56) three times (6 rows total). | 33 (29) sts |
| Last Row | Bind off all 33 (29) stitches loosely. FO, leaving a long tail (at least 20 inches / 50 cm) for seaming. | Bind Off |
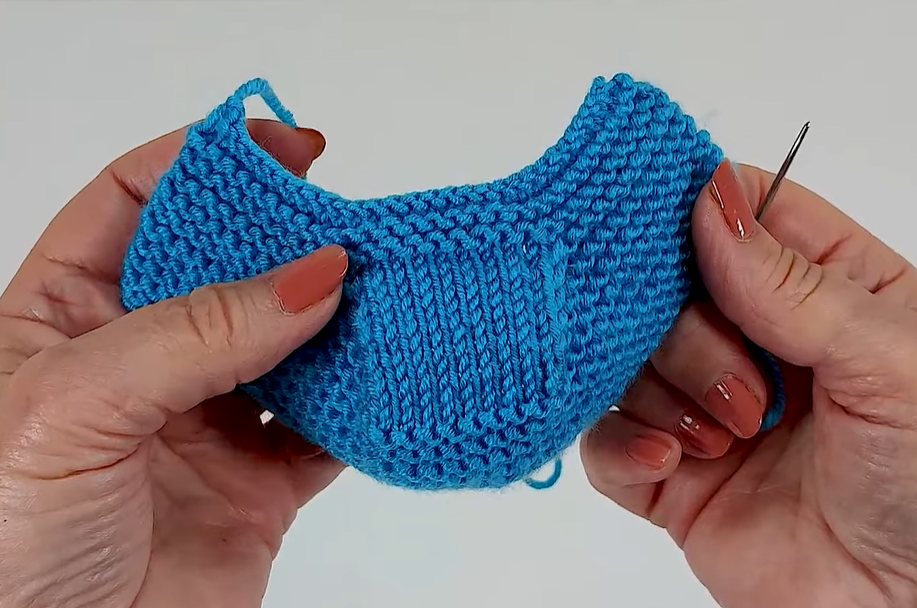
 Finishing and Assembly (The Contoured Fit)
The final shape of the bootie is defined by the strategic folding and seaming of the knit piece.
- Seam the Heel:
- Fold the entire knit piece in half lengthwise.
- Using the long tail from the final bind-off, seam the final 10 rows of the heel together using the Mattress Stitch. This closes the back of the bootie.
- Seam the Sole:
- Continue the seam down the entire bottom edge (the sole), running from the center heel, under the foot, and towards the toe.
- For the last 10 rows toward the toe, gently cinch the seam tighter as you go to create the rounded, pointed toe shape.
- Secure the seam firmly at the toe tip.
- Embellishment: Stitch the decorative bow or button securely onto the top center of the toe/instep (approximately over Row 20) as shown in the original image.
- The Second Bootie: Repeat the entire process for a perfect, mirrored pair.