by
by Absolutely! Here’s a detailed guide on how to easily make a cute Boston bag using DIY ‘circles’ — a unique and fun twist on the classic Boston bag design that uses circular side panels. This is a creative, beginner-friendly sewing project that turns simple shapes into something super stylish and useful.

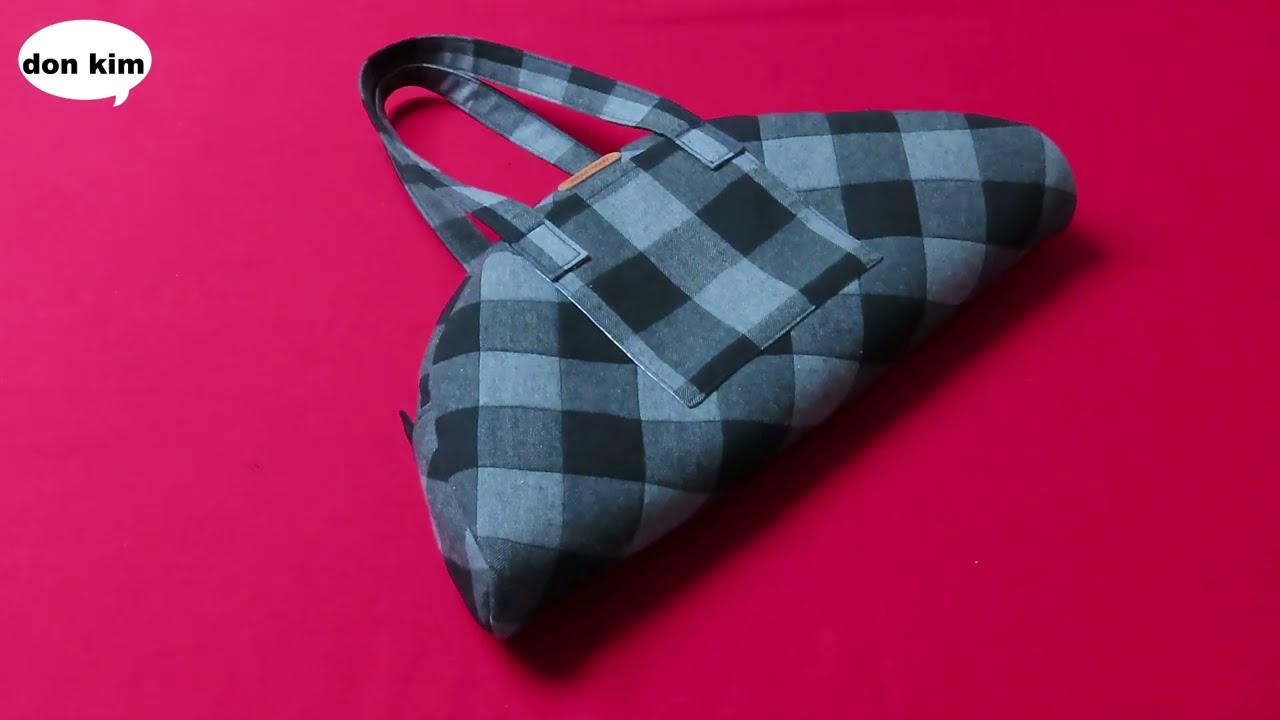
👜 How to Easily Make a Cute Boston Bag Using DIY Circles
✂️ What You’ll Need:
-
Fabric for outer bag (cotton, canvas, denim, or faux leather)
-
Fabric for lining
-
Fusible interfacing or foam stabilizer (for structure)
-
Zipper (around 10–12 inches)
-
2 fabric circles (for the sides)
-
2 fabric rectangles (for the main body)
-
Straps or webbing for handles (or make your own from fabric)
-
Sewing machine
-
Basic sewing tools: thread, scissors, pins, ruler, marking chalk, iron
🪡 Step-by-Step Instructions:
🧵 Step 1: Cut Your Fabric
✅ Main Body:
-
Cut 2 rectangles: approx. 12” wide x 7” tall (outer fabric)
-
Cut the same 2 rectangles from lining fabric
-
Cut 2 rectangles of interfacing to match and fuse to outer rectangles
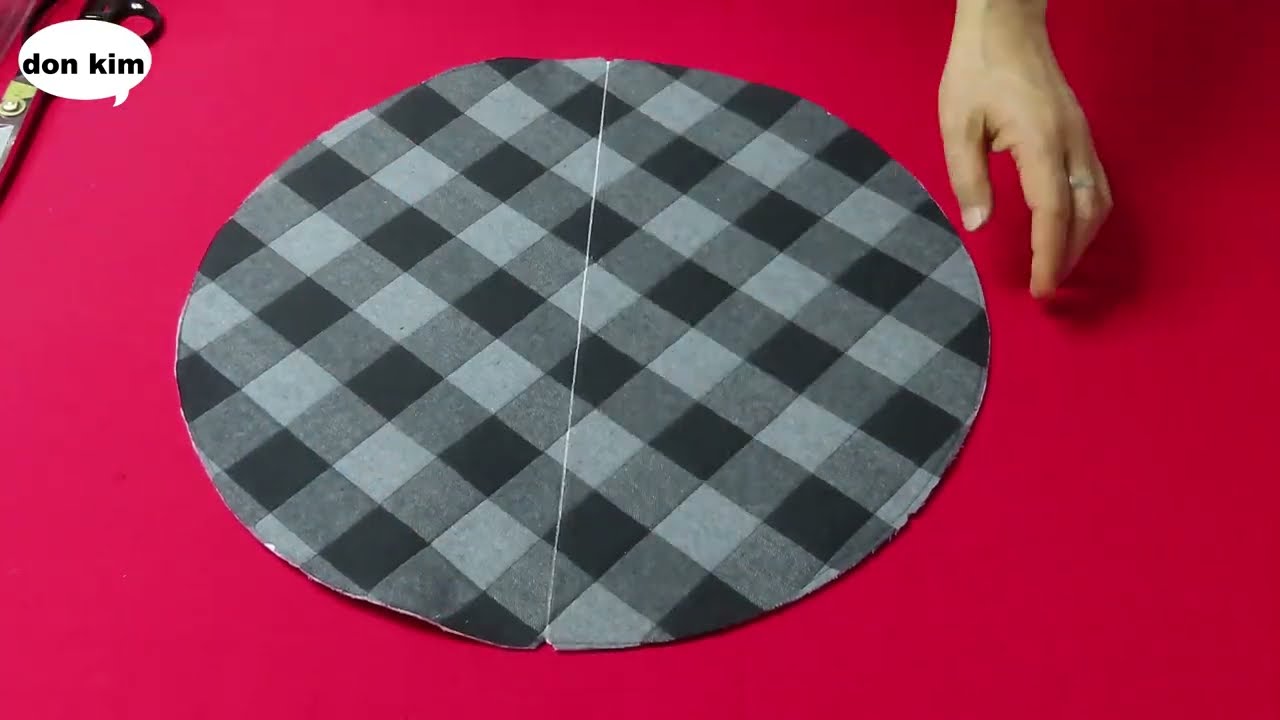
✅ Side Circles:
-
Cut 2 circles for the side panels, about 7” diameter
-
Use a bowl or compass to trace a perfect circle
-
Cut 2 lining circles and 2 interfacing circles
-
Fuse interfacing to the wrong side of outer circles
-
✅ Zipper Panel:
-
Cut a strip 2.5” wide x 12” long (for zipper)
-
Optional: Back it with interfacing
✅ Handles:
-
Use 2 fabric strips or webbing, each about 12–15” long and 1” wide
-
If making from fabric, fold long strips inward like bias tape, press, and sew
🧵 Step 2: Sew the Zipper Panel
-
Fold under ¼” on both long edges of the zipper panel.
-
Place zipper in the center and topstitch it between the folds.
-
The zipper should now be neatly enclosed in the fabric strip.
-
Attach this completed zipper panel to the top of one main body piece.
🧵 Step 3: Assemble the Main Body
-
Place right sides of the main body rectangles together, sandwiching the zipper panel.
-
Sew the sides and bottom edges (not the zipper edge).
-
Press seams open and turn right side out.

🧵 Step 4: Attach the Circles (Side Panels)
-
Pin or clip the circular side pieces to each end of the main body, right sides together.
-
Match notches or mark quarters to evenly align the edges.
-
Sew slowly around the circle, easing the fabric as you go.
-
Repeat for the other side.
-
Trim seam allowances or clip curves for a smooth finish.
🧵 Step 5: Add Handles
-
Position the handles evenly on each side of the main body (about 3″ from center on each side).
-
Sew each end securely with an “X” box stitch for strength.
🧵 Step 6: Add the Lining
-
Sew the lining body pieces and circles just like the outer bag — but leave a 3–4” opening at the bottom.
-
With the outer bag right side out and the lining inside out, insert the outer bag into the lining.
-
Line up the top edges and sew all the way around the zipper edge.
-
Turn the bag right side out through the opening in the lining.
-
Stitch the lining closed, then tuck it neatly into the bag.
🎀 Optional Add-ons:
-
Interior pocket: Add a simple patch pocket to one lining panel before assembly.
-
Adjustable strap: Add D-rings on the side for a crossbody strap.
-
Decorations: Embroider, applique, or use patterned fabric for fun details.
🧠 Why This Circle-Based Boston Bag is Genius:
-
Beginner-friendly: Simple shapes, no tricky corners.
-
Stylish design: The circle sides give it a boutique-style shape.
-
Scrap-buster: Great for using leftover fabric pieces.
-
Functional: Use it as a handbag, lunch tote, or travel pouch.
Watch video: