 by
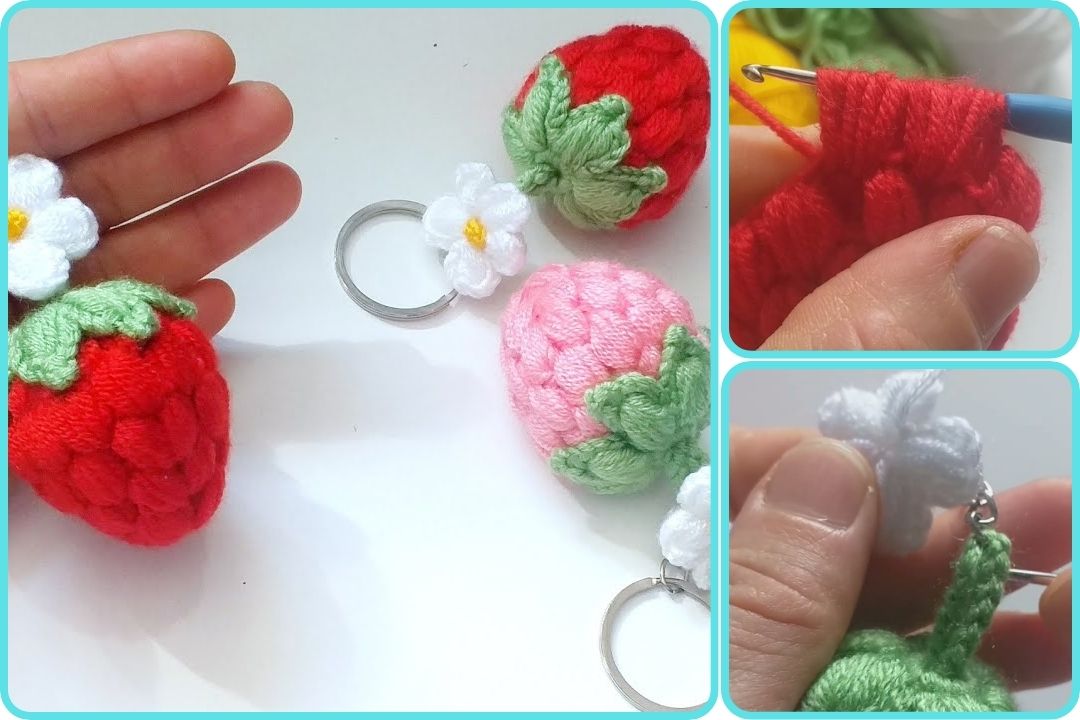
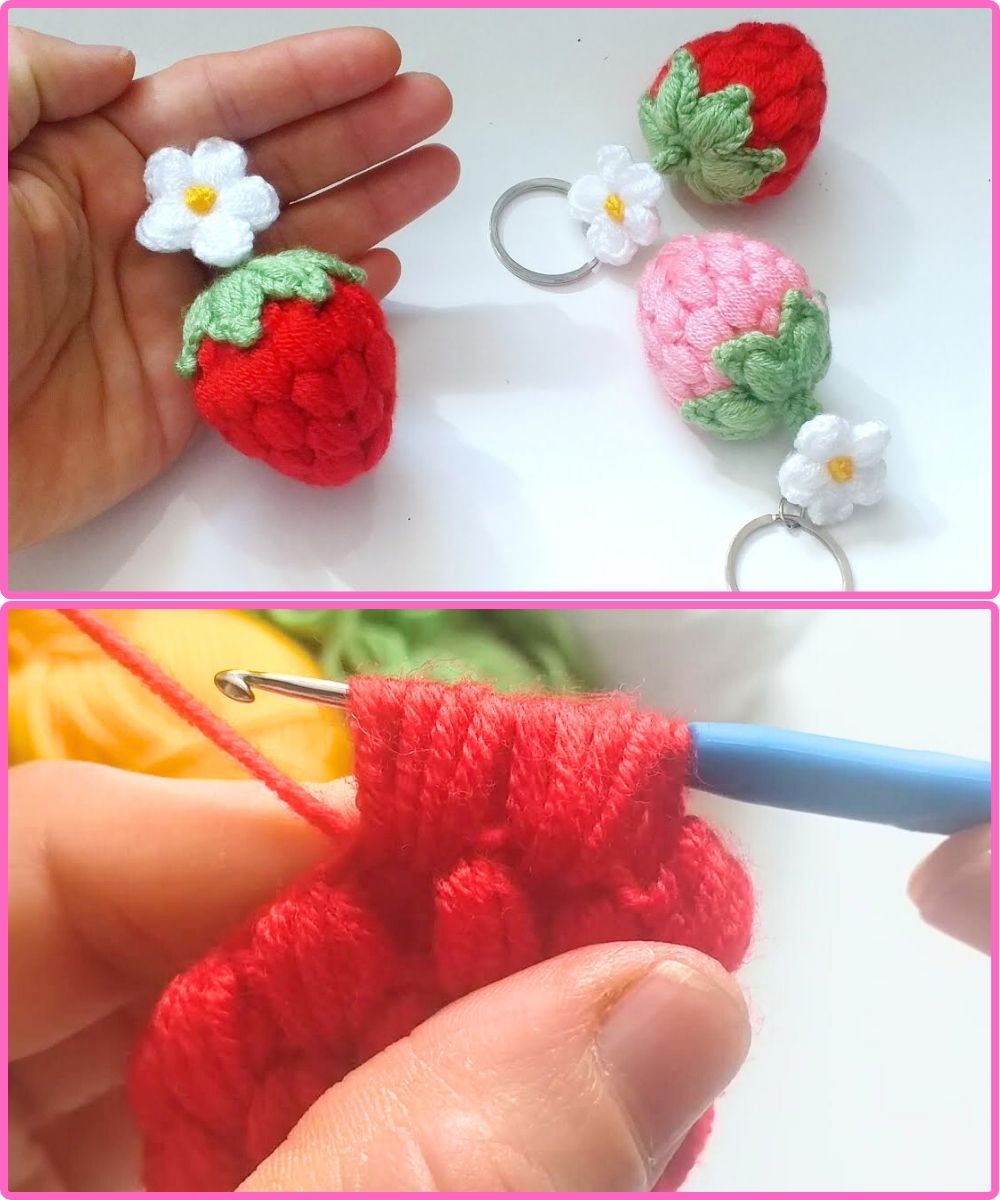
by It sounds like you’re interested in making a adorable and popular crochet item: a Puff Puff Crochet Strawberry Keychain! These are fantastic projects for beginners and work up quickly. The “puff puff” likely refers to the use of the puff stitch (or a similar cluster stitch) to create the strawberry’s signature bumpy, realistic texture.
These tutorials are widely available on YouTube, and many of them are indeed subtitled for easy understanding across different languages.
Here’s a detailed guide on how to approach making one, combining common techniques seen in these tutorials:
Understanding the “Puff Puff” Element:
The “Puff Puff” in the name directly refers to the Puff Stitch. This stitch creates a raised, rounded “puff” on the surface of your crochet fabric. It’s perfect for giving the strawberry its natural, lumpy appearance.
Materials You Will Need:
- Red Yarn: For the strawberry body. Choose a yarn weight that matches your desired size for the keychain (e.g., DK/light worsted for a small keychain, worsted/Aran for a slightly larger one). Cotton or acrylic yarn works well.
- Green Yarn: For the leaves/calyx at the top.
- Yellow or Cream Yarn (optional): For embroidering the “seeds” onto the strawberry.
- Crochet Hook: A hook size appropriate for your chosen yarn. Check the yarn label for recommendations. For keychains, a slightly smaller hook than recommended can help create a denser fabric so stuffing doesn’t show through.
- Stuffing: Polyester fiberfill (Poly-fil) or cotton stuffing to give the strawberry its 3D shape.
- Tapestry Needle: For weaving in ends and embroidering seeds.
- Scissors: For cutting yarn.
- Keychain Ring: A metal keychain ring to attach your finished strawberry.
- Pliers (optional): Small jewelry pliers can be helpful for opening and closing the keychain ring.

Crochet Terms (US Terminology – most common in these tutorials):
- ch: Chain
- sl st: Slip Stitch
- sc: Single Crochet
- hdc: Half Double Crochet
- dc: Double Crochet
- Puff St: Puff Stitch (detailed instructions below)
- inc: Increase (usually 2 sc in one stitch)
- dec: Decrease (usually sc2tog – single crochet 2 together)
- MR/Magic Ring/Magic Circle: Adjustable ring to start working in the round.
- FO: Finish Off (cut yarn and pull through loop to secure)
How to Make a Puff Stitch (Common Method):
The exact way a puff stitch is made can vary slightly, but here’s a common method you’ll likely see:
- Yarn over (YO).
- Insert hook into the indicated stitch.
- YO, pull up a loop. (You now have 3 loops on your hook)
- Repeat steps 1-3 a specified number of times (e.g., 2, 3, or 4 more times into the same stitch). Each time you repeat, you’ll add 2 more loops to your hook. For a “chunky” puff, you might repeat 3-4 times.
- YO, pull through all loops on your hook (except the very first loop).
- YO, pull through the remaining 2 loops on your hook to close the puff stitch.
- Chain 1 (optional): Some patterns include a chain 1 after the puff to secure it, which also adds a little space between puffs.

General Step-by-Step Instructions for the Strawberry Keychain:
Note: Specific stitch counts will vary by tutorial. It’s best to follow along with a video for exact numbers.
Part 1: The Strawberry Body (Red Yarn)
- Start with a Magic Ring: Create a magic ring.
- Round 1: Work a specific number of puff stitches into the magic ring, separated by chain 1 spaces (e.g., 5-6 Puff St, ch 1). Join with a slip stitch to the first puff stitch.
- Increase Rounds: For the next few rounds, you will typically increase the number of puff stitches to create the wider base of the strawberry. This is usually done by working 2 puff stitches into each chain-1 space or by alternating 1 puff and 2 puffs in the spaces.
- The pattern will likely tell you to work into the chain-1 spaces from the previous round.
- Continue increasing until you reach the desired width for your strawberry.
- Straight Rounds: Work a few rounds without increases to create the middle body of the strawberry. Each puff stitch will typically be worked into the chain-1 space of the previous round.
- Decrease Rounds: To shape the top of the strawberry, you will start decreasing. This is often done by skipping chain-1 spaces, or by working puff stitches together (puff st dec). Continue decreasing until the opening is small enough to close.

- Stuffing: Before the opening gets too small, tightly stuff the strawberry with fiberfill. Make sure it’s firm and holds its shape.
- Close the Opening: Finish off the yarn, leaving a long tail. Use your tapestry needle to weave the tail through the remaining stitches and pull tight to close the hole. Secure with a knot and weave in the tail.
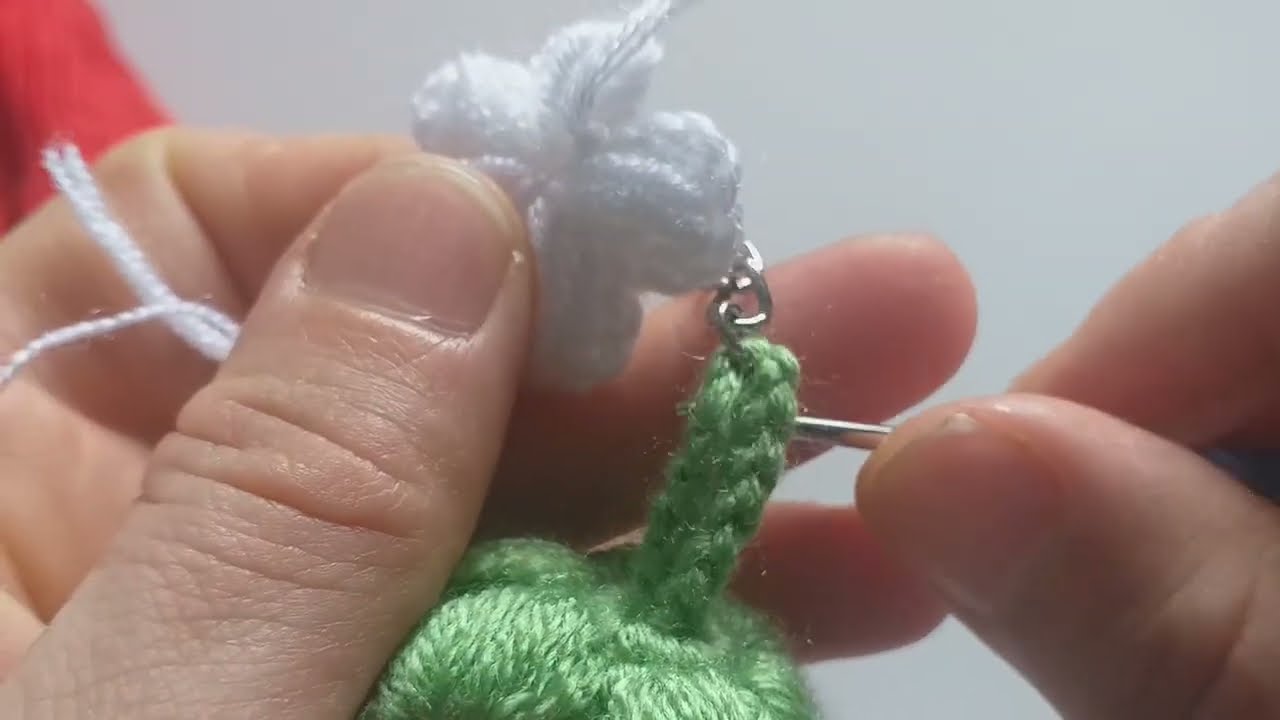
Part 2: The Leaves/Calyx (Green Yarn)
There are several ways to make the leaves:
- Simple Chain Loops:
- Join green yarn to the top center of the strawberry.
- Chain a few stitches (e.g., 5-7 chains).
- Slip stitch back into the same point on the strawberry, or into a nearby stitch, to form a loop.
- Repeat to create 3-5 leaf loops around the top.
- Chain a longer loop at the end for attaching the keychain ring (e.g., 15-20 chains). Slip stitch to secure.
- Small Leaf Appliqué: Some patterns might involve crocheting small, flat leaf shapes separately and then sewing them onto the top. These often use slip stitches, single crochets, and half double crochets to create the leaf shape.
- Puff Flower Style Leaves: Some tutorials might make a small “puff flower” with green yarn and attach it to the top.
Part 3: Embroidering Seeds (Yellow/Cream Yarn – Optional but Recommended)
- Thread your tapestry needle with yellow or cream yarn.
- Randomly embroider small “V” shapes or tiny straight stitches onto the red strawberry body to resemble seeds. You can do this by bringing the needle up from inside the strawberry, making a small stitch on the surface, and going back into the strawberry.
- Secure the ends of the seed yarn inside the strawberry by tying a knot and weaving them in.
Part 4: Attaching the Keychain Ring
- Open your metal keychain ring using pliers (if needed) or by twisting it open.
- Thread the keychain ring through the chain loop you created at the top of the leaves.
- Close the keychain ring securely.
Tips for Success:
- Watch the Video: For “Puff Puff Strawberry Keychain” specifically, watching a video tutorial is highly recommended. The visual demonstration of the puff stitch and the shaping of the strawberry is incredibly helpful. Search on YouTube for “Puff Puff Crochet Strawberry Keychain” or “Puff Stitch Strawberry Keychain.”
- Practice the Puff Stitch: If you’re new to the puff stitch, practice it a few times before starting your strawberry to get a feel for it.
- Stuff Firmly: Stuff your strawberry quite firmly to give it a nice, plump, and well-defined shape.
- Subtitles: Look for videos that explicitly state they are “subtitled” in English or your preferred language for clear instructions.
Enjoy making your adorable strawberry keychain! They make great gifts or market items.
Watch video: