 by
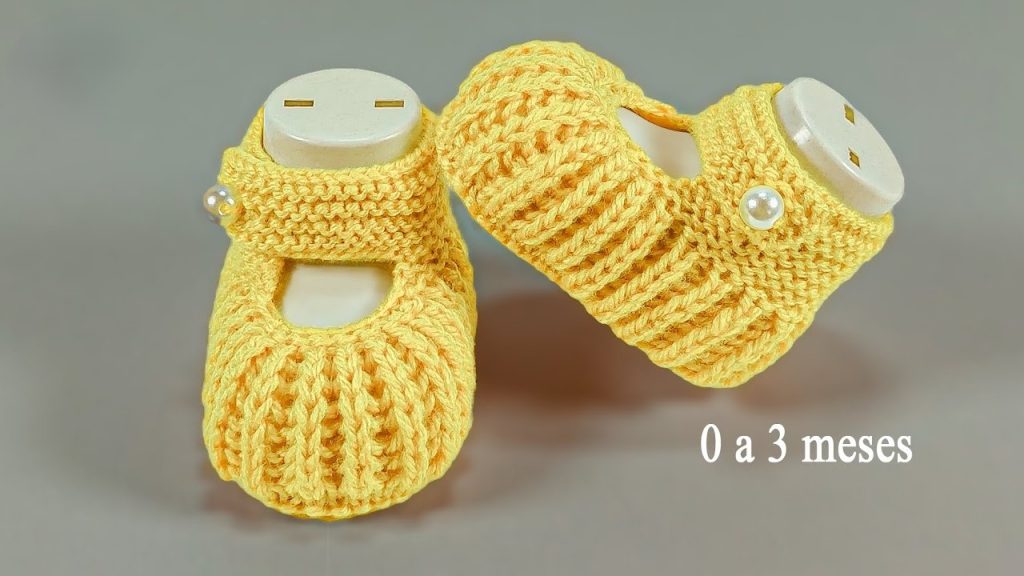
by Welcome, knitters! Discover how to create these absolutely delightful Sunny Mary Jane Booties. This design is a perfect blend of style and comfort for tiny feet, featuring an all-over 1×1 ribbing that provides fantastic stretch and a beautiful vertical texture. The practical Mary Jane strap ensures the booties stay on securely, all finished with a charming pearl button.
This comprehensive pattern is worked flat, then meticulously seamed, and is perfectly sized for Newborns (0–3 months).
 Materials Needed
- Yarn: Approximately 75 – 100 yards (70 – 90 meters) of a soft DK weight (light worsted/8-ply) yarn in your main color (Sunny Yellow).
- Prioritize a soft, breathable yarn that is machine washable, as it’s ideal for baby items.
- Needles: A pair of US size 5 (3.75 mm) straight knitting needles.
- A slightly smaller needle size helps to create a dense, warm fabric and defined ribbing.
- Notions:
- Tapestry Needle for expert seaming and weaving in ends.
- Sharp Scissors.
- 2 Small Pearl Buttons (approximately 1/2 inch or 12mm) for the strap closure.
- Stitch marker (optional, for marking buttonhole placement).
 Gauge (Essential for Baby Fit)
- Gauge: 24 stitches and 32 rows equals 4 inches (10 cm) in 1×1 Ribbing (unstretched).
- Why Gauge is Critical: Ribbing naturally pulls in, so achieving the correct gauge ensures the overall size is accurate and the bootie fits comfortably without being too tight or loose.
 Key Techniques & Abbreviations
This pattern is worked flat and uses basic stitches, simple shaping, and the stretchy nature of 1×1 ribbing.
- K = Knit
- P = Purl
- st(s) = Stitch(es)
- RS = Right Side
- WS = Wrong Side
- K2tog = Knit two stitches together (a right-leaning decrease).
- ssk = Slip, Slip, Knit (a left-leaning decrease).
- yo = Yarn Over (creates an eyelet, used for buttonhole).
- 1×1 Rib: Alternating K1, P1.
- Cast On: Using the long-tail cast-on method for a stretchy edge.
- Bind Off: Standard bind-off.
 The Pattern: Sunny Mary Jane Booties (Newborn: 0-3 Months)
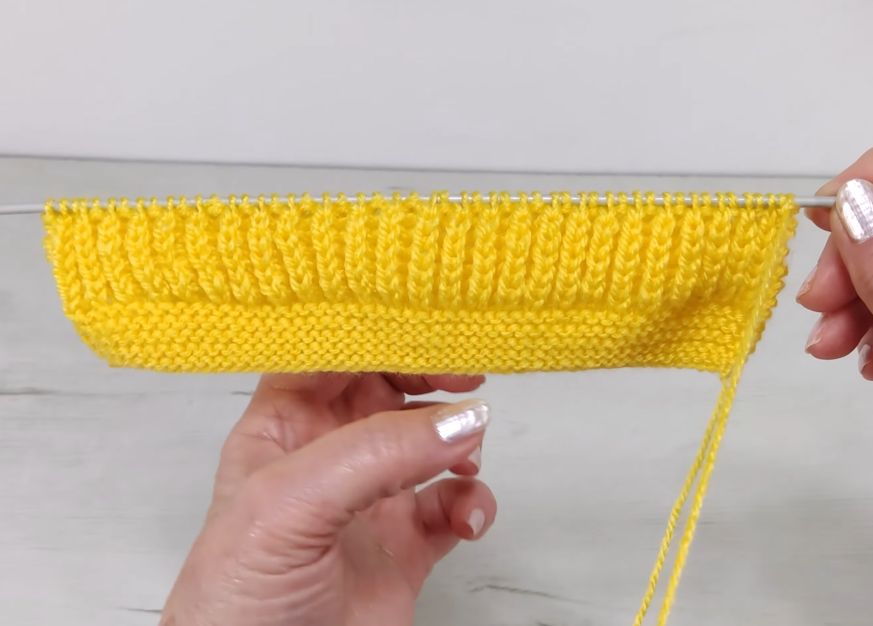
The bootie is worked from the sole up, with increases and decreases shaping the foot.
 The Sole and Body (The Core)
We begin at the base of the foot, shaping the sole and main body in 1×1 Ribbing for consistent texture.
| Step | Instructions | Stitch Count |
| Cast On | Cast on 32 stitches loosely. | 32 sts |
| Row 1 (RS) | Work in 1×1 Rib across: *K1, P1*. Repeat from * to * across. | 32 sts |
| Row 2 (WS) | Work in 1×1 Rib across: *P1, K1*. Repeat from * to * across. | 32 sts |
| Rows 3–14 | Repeat Rows 1 and 2 for a total of 14 rows. This forms the initial sole section. | 32 sts |
| Row 15 (RS) | K1, M1 (make 1), work in 1×1 Rib to the last st, M1, K1. | 34 sts |
| Row 16 (WS) | Work in 1×1 Rib across. | 34 sts |
| Row 17 (RS) | K1, M1, work in 1×1 Rib to the last st, M1, K1. | 36 sts |
| Row 18 (WS) | Work in 1×1 Rib across. | 36 sts |
| Rows 19–30 | Continue working in 1×1 Rib for 12 more rows. This creates the main body of the foot. | 36 sts |
 Toe Shaping (The Instep Curve)
These decreases create the gentle curve over the top of the baby’s foot.
| Row | Instructions | Stitch Count |
| Row 31 (RS) | Work in 1×1 Rib for 10 sts. (K2tog, P2tog) twice. Work in 1×1 Rib for 10 sts. | 32 sts |
| Row 32 (WS) | Work in 1×1 Rib across. | 32 sts |
| Row 33 (RS) | Work in 1×1 Rib for 8 sts. (K2tog, P2tog) twice. Work in 1×1 Rib for 8 sts. | 28 sts |
| Row 34 (WS) | Work in 1×1 Rib across. | 28 sts |
Export to Sheets
 Ankle Cuff and Strap
This section creates the ankle height and the Mary Jane strap with its buttonhole.
| Row | Instructions | Stitch Count |
| Rows 35–42 | Continue working in 1×1 Rib for 8 rows. This forms the lower ankle height. | 28 sts |
| Row 43 (RS) | Work in 1×1 Rib for 10 sts. Cast on 8 stitches (for the strap). Turn. (This leaves 18 sts unworked for the back heel). | 18 sts (on needle) |
| Row 44 (WS) | Work in 1×1 Rib across all 18 sts. | 18 sts |
| Row 45 (RS) | Buttonhole Row: Work in 1×1 Rib for 2 sts, K2tog, yo, Work in 1×1 Rib to end. This creates the buttonhole. | 18 sts |
| Rows 46–48 | Work in 1×1 Rib for 3 more rows. | 18 sts |
| Last Row | Bind off all 18 stitches in 1×1 Rib pattern. FO, leaving a long tail (approx. 15 inches / 38 cm) for attaching the strap. | Bind Off |

 Back Heel Cuff
We now work the remaining unworked stitches to complete the heel.
| Row | Instructions | Stitch Count |
| Rejoin Yarn | Rejoin yarn at the beginning of the 18 unworked stitches from Row 43. | 18 sts |
| Rows 43a–48a | Work in 1×1 Rib for 6 rows. | 18 sts |
| Last Row | Bind off all 18 stitches in 1×1 Rib pattern. FO, leaving a long tail (approx. 20 inches / 50 cm) for seaming. | Bind Off |
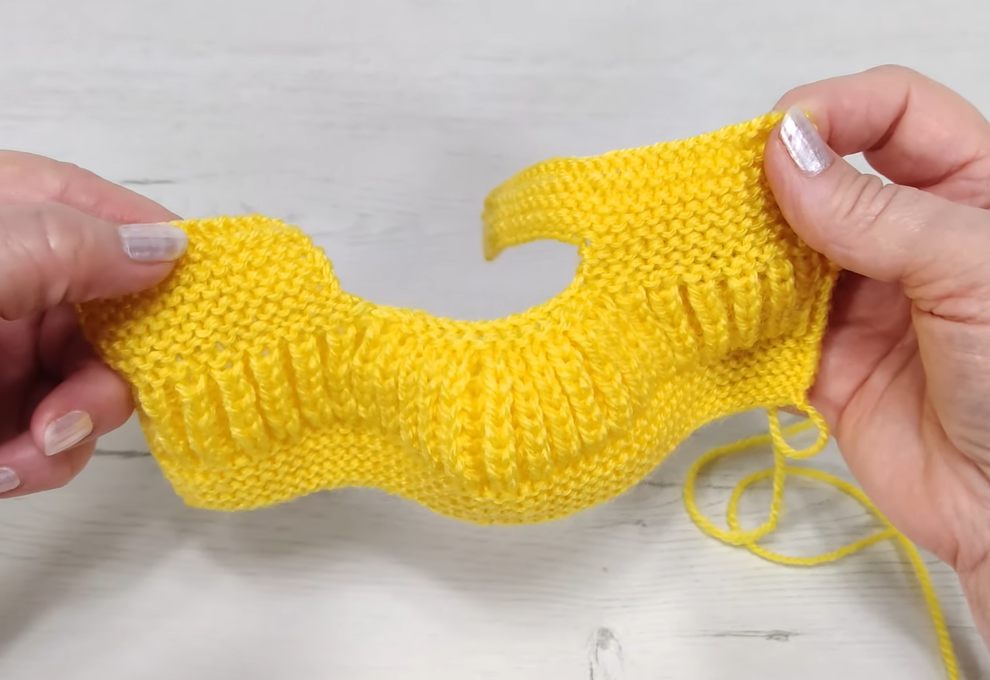
 Finishing and Assembly (The Transformation)
Careful seaming is key to giving the bootie its elegant shape.
- Seam the Back Heel:
- Fold the back heel piece in half.
- Using the long tail from the final bind-off of the heel (Section 4), seam the short edges of the back heel together using the Mattress Stitch. This creates a seamless back heel.
- Seam the Sole:
- Continue the seam down the entire bottom edge (the sole), running from the center heel towards the toe.
- As you approach the toe, gently cinch the seam tighter for the last 6-8 rows to create the rounded, slight pointed toe shape.
- Secure the seam firmly at the toe tip.
- Attach the Strap:
- Position the finished strap across the top of the instep.
- Using the yarn tail from the strap, securely sew the loose end of the strap to the side of the bootie, aligning it to comfortably cross the foot.
- Attach the Button:
- Align the strap across the foot and mark the spot where the buttonhole lines up with the opposite side of the bootie.
- Using a sewing needle and matching thread, securely stitch one pearl button at this marked spot.
- Final Weaving: Weave in all remaining yarn ends discreetly on the inside of the bootie.
- The Second Bootie: Repeat the entire process for a matching pair! Remember to mirror the buttonhole placement if you prefer the strap to go in the opposite direction for the second bootie.