 by
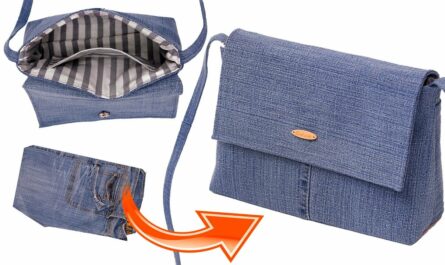
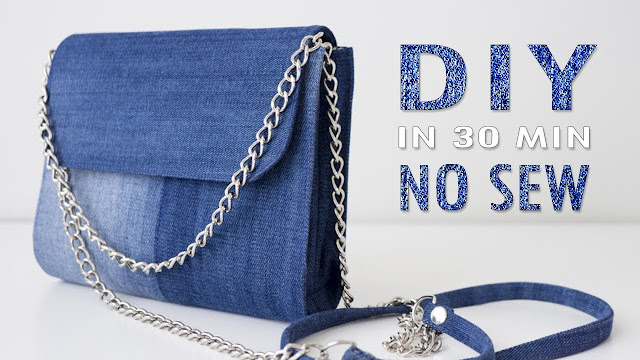
by Making your own clutch is a rewarding project that allows for endless customization. This pattern will guide you through creating a sturdy and chic zippered clutch, similar in style to the one you’ve shared, but with the added strength and professional finish that comes from sewing. It’s an excellent project for a confident beginner who wants to practice working with zippers and zippers.

Materials
- Outer Fabric: Denim or canvas fabric scraps. You’ll need at least two pieces measuring 10″ x 12″.
- Lining Fabric: A coordinating cotton fabric (two pieces measuring 10″ x 12″).
- Zipper: One 10-inch or longer nylon zipper.
- D-Rings: Two 1/2-inch D-rings.
- Chain Strap: A pre-made chain strap with clasps, or a length of chain with two jump rings.
- Thread: All-purpose thread that matches your fabric.
- Fusible Interfacing (Optional): Medium-weight interfacing for added structure.
- Basic sewing supplies: Sewing machine, scissors, pins or clips, measuring tape, and an iron.
Cutting List
- Main Body (Outer Fabric): Cut two rectangles measuring 10″ wide x 12″ tall.
- Lining Fabric: Cut two rectangles measuring 10″ wide x 12″ tall.
- Side Tabs (Outer Fabric): Cut two small rectangles measuring 3″ wide x 2″ tall.
- Fusible Interfacing: Cut two rectangles measuring 10″ wide x 12″ tall.
Sewing Instructions
Note: Use a 1/2-inch seam allowance throughout the pattern unless otherwise noted.
Step 1: Prepare the Fabric and Zipper
- Press the fusible interfacing onto the wrong side of your two Main Body (Outer Fabric) pieces, following the manufacturer’s instructions.
- Lay one of your interfaced outer fabric pieces right side up. Place your zipper, teeth up, along the top 12-inch edge.
- Place one of your lining pieces on top, wrong side up, aligning the top edges with the zipper. Pin all three layers.
- Using a zipper foot on your machine, sew a straight line along the edge, securing the layers to the zipper.

Step 2: Attach the Remaining Pieces
- Fold the fabric pieces away from the zipper and press the seam. Topstitch along the seam for a neat, professional finish.
- Repeat the process for the other side of the bag. Attach the other outer and lining fabric pieces to the remaining side of the zipper in the same way.
- Give the entire piece a good press with an iron.

Step 3: Create the Side Tabs
- Take your two Side Tabs pieces. Fold each piece in half lengthwise, right sides together, and sew the long edge to create a tube.
- Turn the tubes right side out and press them flat.
- Slide a D-ring onto each of the two tabs. Fold the fabric in half with the D-ring inside the fold, aligning the raw edges.
Step 4: Assemble the Bag
- Open the zipper halfway. Lay the bag flat with the outer fabrics right sides together and the lining fabrics right sides together. The zipper should be at the center.
- Pin the side tabs on the outside, in between the outer and lining fabrics, about 1 inch down from the zipper. Pin the tabs with the D-rings pointing inward.
- Pin all the way around the outer bag, leaving a 4-inch opening on the bottom of the lining for turning.
- Starting from one side of the lining, sew all the way around the bag, pivoting at the corners. Be careful to sew slowly over the zipper teeth.
Step 5: Turn and Finish
- Reach into the opening you left in the lining and carefully pull the entire bag right-side out. Gently push out the corners to create a nice shape.
- Hand-sew the opening in the lining closed with a ladder stitch for an invisible finish.
- Give the finished bag a final press with an iron.
- Attach the chain strap to the D-rings, and your custom denim clutch is complete!